Showing posts with label Ranger. Show all posts

Saturday, July 18, 2015

AUGUST 2015 HIP KIT REVEAL + a new layout!!

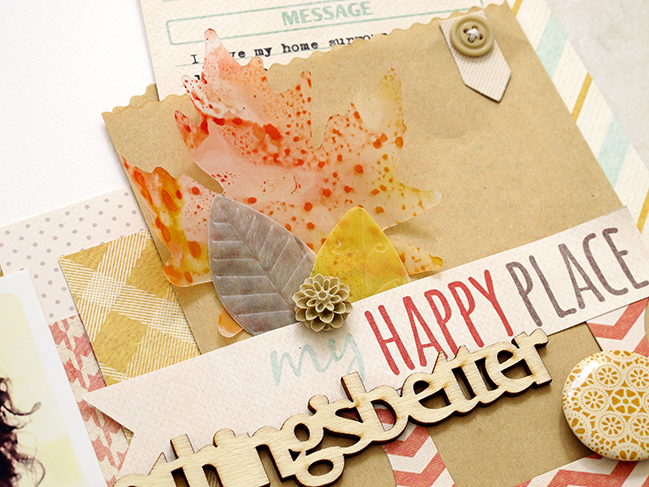
The stunning August Hip Kit kit is live for purchase. Isn't it gorgeous...the colors, patterns & accents...sigh! 
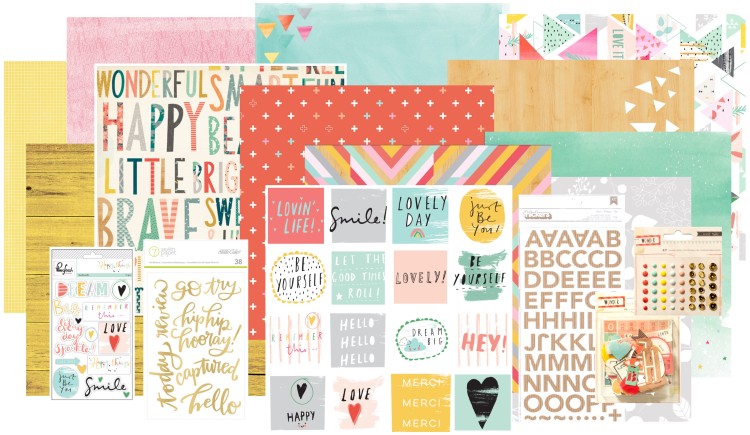
AUGUST 2015 HIP KIT (main kit)
Main
Hip Kit Club Member Price:  $29.95 (requires a 3 month minimum subscription)CLICK HERE to join! Individual Kit Purchase Price:  $34.95
Products Included:
  • 1 sheet Pink Fresh Studio – Happy Things – Rustic Triangle Paper
  • 1 sheet Pink Fresh Studio – Happy Things – Botanical Sparkle Paper
  • 1 sheet Pink Fresh Studio – Happy Things – Happy Words Paper
  • 1 sheet Simple Stories – Simple Basics – Yellow Wood Grid Paper
  • 1 sheet Studio Calico – Amelia – Paper 002
  • 1 sheet Studio Calico – Amelia – Paper 004
  • 1 sheet American Crafts – Amy Tangerine Rise & Shine – Ava Paper
  • 1 sheet Crate Paper – Wonder – Bright Paper
  • 1 pkg. Pink Fresh Studios – Happy Things – Puffy Stickers
  • 1 pkg. Studio Calico – Amelia – Gold Phrase Stickers
  • 1 pkg. Crate Paper – Wonder – Kraft Charm Corrugated Thickers
  • 1 pkg. Crate Paper – Wonder – Ephemera
  • 1 pkg. Crate Paper – Wonder – Enamel Dots & Sequins

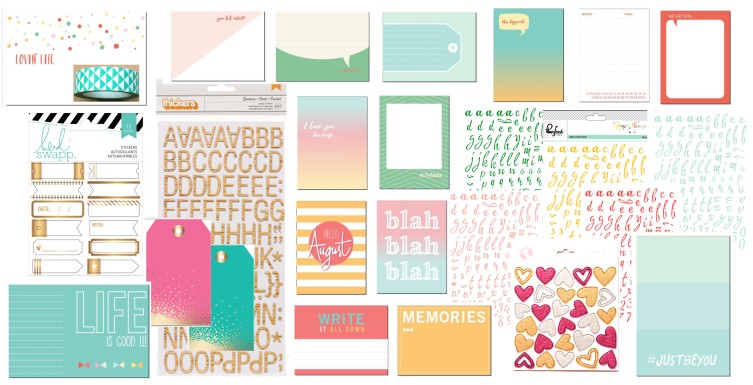
AUGUST 2015 PROJECT LIFE ADD-ON KIT (PL cards designed by me!!)
Project Life
Price:  $29.95*
*Hip Kit Club members receive a 15% off on all Add-On Kit purchases
Products Included:
  • 25 Hip Kit Club exclusive Project Life Cards designed by Kim Watson
  • 1 pkg. Pink Fresh Studios – Happy Things – Mini Alphabet Stickers  (5 sheets)
  • 1 pkg. American Crafts – Amy Tangerine Yes Please – Woodgrain Thickers
  • 1 pkg. Freckled Fawn – Chipboard Glitter Hearts
  • 1 roll – Freckled Fawn – Aqua Triangle – Washi Tape
  • 2 each – American Crafts – Gold Accented Pink Tags (4.25 x 2.5)
  • 2 each – American Crafts – Gold Accented Aqua Tags (4.25 x 2.5)
  • 1 pkg. Heidi Swapp – Wanderlust – Gold Accented Label Stickers

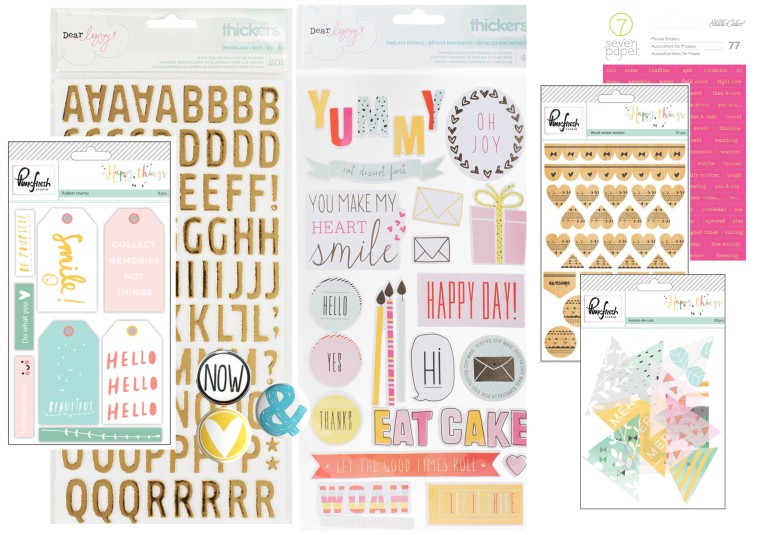
AUGUST 2015 EMBELLISHMENT ADD-ON KIT
Embellishment
Price:  $29.95**Hip Kit Club members receive a 15% off on all Add-On Kit purchases
Products Included:
  • 1 pkg. – Pink Fresh Studio – Pretty Things – Rubber Charm Tags
  • 1 pkg. – Pink Fresh Studio – Pretty Things – Acetate Die Cut Triangles
  • 1 pkg. – Pink Fresh Studio – Pretty Things – Wood Veneer Shapes
  • 1 pkg. – American Crafts – Dear Lizzy Fine & Dandy – Woodland Gold Thickers
  • 1 pkg. – American Crafts – Dear Lizzy Fine & Dandy – Phrase & Accent Thickers
  • 1 sheet – Studio Calico – Amelia – Pink & Gold Accented Mini Word Stickers
  • 3 each – Flair Buttons – designed by A Flair for Buttons

AUGUST 2015 COLOR ADD-ON KIT (Stencils designed by me!!)
Color Watermark
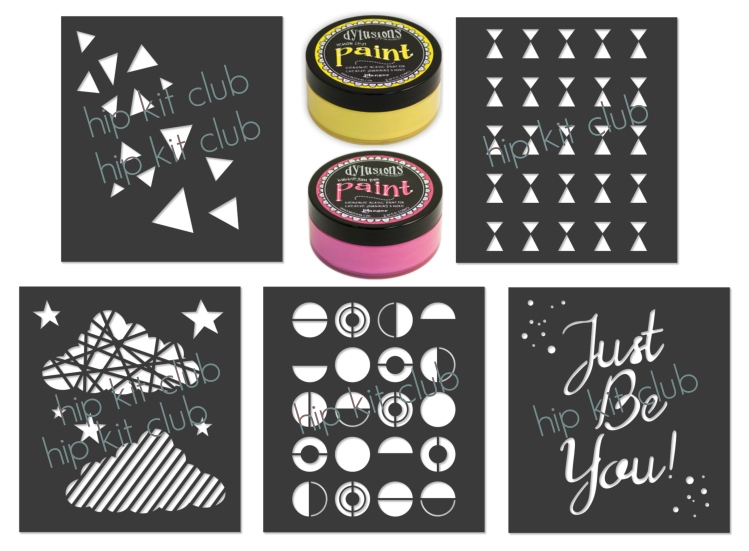
Price:  $22.95**Hip Kit Club members receive a 15% off on all Add-On Kit purchases
Products Included:
  • 1 set of Hip Kit Club Exclusive Stencils designed by Kim Watson
  • 1 jar – Ranger – Dylusions Paint – Bubblegum Pink
  • 1 jar – Ranger – Dylusions Paint – Lemon Zest

AUGUST 2015 PAPER ADD-ON KIT
Paper
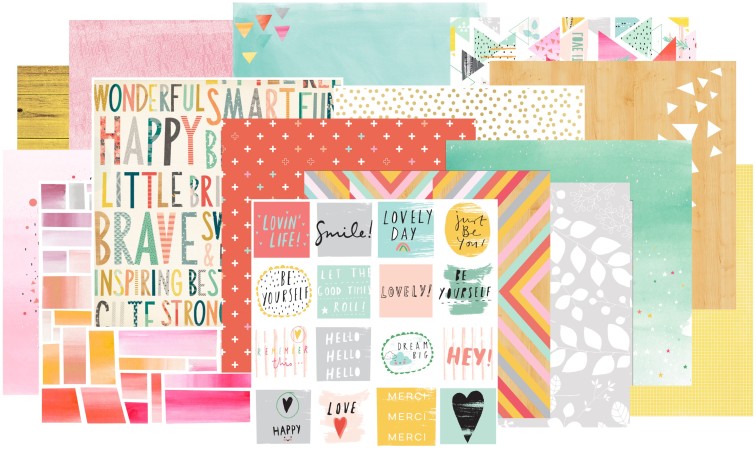
Price:  $12.95**Hip Kit Club members receive a 15% off on all Add-On Kit purchases
Products Included:
  • 1 sheet Pink Fresh Studio – Happy Things – Rustic Triangle Paper
  • 1 sheet Pink Fresh Studio – Happy Things – Botanical Sparkle Paper
  • 1 sheet Pink Fresh Studio – Happy Things – Happy Words Paper
  • 1 sheet Pink Fresh Studio – Happy Things – Ombre Mosaic Paper (NOT IN MAIN KIT)
  • 1 sheet Simple Stories – Simple Basics – Yellow Wood Grid Paper
  • 1 sheet Studio Calico – Amelia – Paper 002
  • 1 sheet Studio Calico – Amelia – Paper 004
  • 1 sheet American Crafts – Amy Tangerine Rise & Shine – Ava Paper
  • 1 sheet Crate Paper – Wonder – Bright Paper
  • 1 sheet – Studio Calico – Amelia – Gold Dot Vellum (NOT IN MAIN KIT)

AUGUST 2015 CARDSTOCK ADD-ON KIT
Cardstock
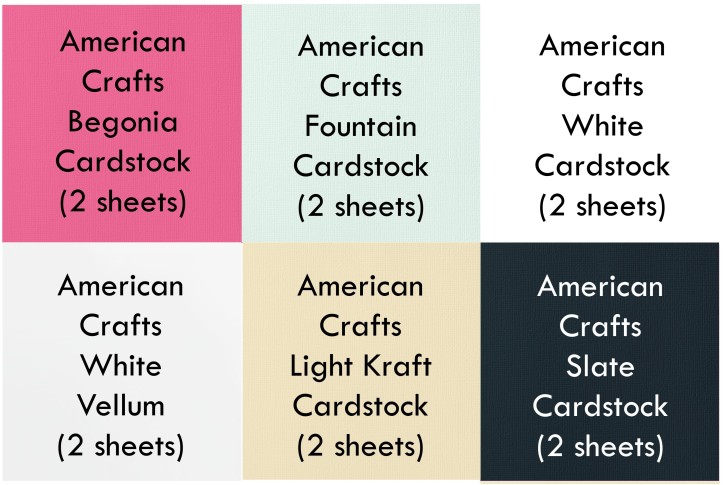
Price:  $10.95**Hip Kit Club members receive a 15% off on all Add-On Kit purchases
Products Included:
  • 2 sheets – American Crafts – Begonia Cardstock
  • 2 sheets – American Crafts – Fountain Cardstock
  • 2 sheets – American Crafts – White Cardstock
  • 2 sheets – American Crafts – White Vellum
  • 2 sheets – American Crafts – Light Kraft Cardstock
  • 2 sheets – American Crafts – Slate Cardstock
Laugh Everyday by Kim Watson

Glad you stopped by friends!!
Have a great weekend!
KJ
xoxo

Tuesday, March 03, 2015

Hip Kit Club- Layouts & a Tutorial.

The 2015 February Main kit from the +HipKitClub is rocking my world!!!

Looking for more inspiration from Hip Kits? Here is a link to my Hip Kit Club Pinterest board filled with amazing projects from the DT.


I have had x2 pages up on the blog so far...check them out!

When playing with the patterned papers on my desk, I was immediately drawn to the doors paper. Firstly, isn’t it seriously cool & secondly, isn’t the paper quality super interesting? It lends itself to mixed media & is substantial enough to withstand water, ink, gesso & other ‘wet’ treatments.
It spoke to me, sparking the following thoughts in my brain in reference to my 10 year old:
  • Future
  • Destiny
  • Open Doors
  • Life Choices
  • Colorful Memories
  • Growing up
These ideas came together, as this page :)

Dream Big by Kim Watson
For the title I roughly cut ‘Dream Big’ from the We R Memory Keepers- Love Notes- Dear Diary paper, using a craft knife & doodled the edge in fine black marker for definition.
 To start, I grabbed water-colour paints & licked some funky colors onto the doors, giving them a cheerful vibe. Once dry, I cut them out & arranged them in an overlapping row creating a border for the journal block. The central page layout worked well here, allowing ones eye to travel down the page from the title, to the photograph & lastly resting on the journaling.

For more detailing check out this blog post >>

 This is my other page:

For this post, I shared a super way to transform patterned paper into something gorgeously ‘bling-ified’ (In case you were wondering, yes that is a real word in the vocab’ of every crafter who likes gold glitter)…like me- LOL.

To do this I am going to be using the February 2015 Hip Kit & Add-On Kitsas well as the pretty turquoise tissue wrapping paper our February 2015 Hip Kit came wrapped in.
Girl Powa by Kim Watson

To create that cool glittered strip, I used the wonderfully ingenious invention, called adhesive sheets from +Scrapbook Adhesives by 3L 
This is how I did it:
  • Lay the edge of the paper triangle onto the sticky side of the adhesive sheet.
  • Trim off the excess.
  • Remove the top, protective layer.
  • Sprinkle liberally with fine gold glitter.
  • Press down firmly, making sure the glitter is secured well. You don’t want it falling off :D
  • Tap off any loose glitter…& you are done.
  • NOTE: I left a little glittered strip at the bottom of the triangle, which I trimmed off & cut into mini triangles for accenting elsewhere on the page.

Tissue Bloom Tutorial by Kim Watson
Instructions:
  • Fold the tissue paper into squares in x2 (or more) different sizes. I made x20 layers in total by cutting them in piles of about 6-8 layers.
  • Once you are happy with the amount, pile them on top of each other.
  • Using a stapler, secure the pile together with criss-crossed staples.
  • Place your flower on one hand & gently scrunch with the other. Pinching layers onto a clump.
  • Place the crunched flower on your craft mat & work with the petals. Flatten some, crinkle others & arrange until you have a lovely, puffy bloom.
  • Using a little water, lightly spray the flower before spritzing with turquoise Dylusions Ink, adding vibrant color.
  • Allow it to dry & secure to your page using a strong adhesive.
All done….a striking page that will make your teenage daughter happy.
I appreciate you stopping by!! 

Happy Tuesday!

Tuesday, February 10, 2015

Crafty ways with everyday products!

Yes...it is the week of LOVE!

Yes... it is commercialised......but let's be honest it is fun, and you can be assured, your loved ones on the receiving end of your love gifts & spoils are surely not going to be complaining about commercialism hehe!

The page I am sharing is a scrapbook layout as published in the Feb 2014 issue of Paper Crafts  & Scrapbooking magazine. It is about our cute daughter & one of her (boy) BFF's. Their love & support of each other in an age where life puts so much pressure on one, is refreshing & sweet! Worthy of a scrapbook page.
Love you to the Moon by Kim WatsonSuppliesCardstock: American Crafts; Patterned paper: +Heidi SwappElle's Studio; Tags & Stamps: Elle's StudioButtons: +Fancy Pants DesignsGlitter: Martha Stewart; Mist, Gesso, Ink and Texture Paste+Ranger InkPen: +Kuretake ZIG ; Adhesive: +Thermoweb+TombowUSA ; Stencils: The Crafters Workshop; Cutting mat, Scissors, Trimmer by +Fiskars ; Buttons; Other: Black charcoal pencil.

When creating this page....I was challenged to use everyday...ordinary things found at home & in your junk drawer.

These are the obscure things I used: 
  • Bamboo coaster mat
  • Crossword pages 
  • Ticket strips
  • Mat & beads
  • Dental floss

I gesso'd a bunch of tickets from the strip to knock back the red color, & created paper feathers in different sizes. One I left as is, the other I covered in liquid glue & dredged in fine gold glitter. Gorgeous!!


See the little wooden frame around the sentiment card? I used a bamboo coaster mat, undid it and used the thin bamboo sticks as the supports for my feathers & frame. I took my extra minty dental floss & dyed with lime green mist...it became a super color accent for the layout, which I looped & tied across the page.  

BONUS: my page smells all fresh & minty! :)


Using a kiddies art mat & beads, I created a 'love' inspired accent which when ironed melted & sealed together. Using zig-zag scissors, I cut the ironing sheet into a circles, stitched it & matted the bead accent on top. The discarded bead template came in real handy to add 'comb-like' texture to texture paste onto the background before misting & inking. I tore dictionary pages into quarters & gesso'd them onto my background page for texture & interest. 

Left white, I used the dental floss to stitch buttons & hand stitching areas for added interest.

Ok...let me say....as bizarre as this challenge was...I loved it. It stretched me creatively & I loved every moment of designing it.

Thanks for stopping by!

Thursday, June 26, 2014

DIY: Make your own enamel dots!

If you are like me & are having a HUGE problem paying R76.00 (retail) for a teeny pack of gorgeous coloured MME emanel dots, then this post is for you.

My scrapping budget is tiny....so paying almost R100 for a few enamel dots just doesn't sit right with me :) I thought, best I get off my lazy, scrapbooking butt & put some of my years of scrapping experience to good use & try & make my own DIY emanel dots.

To get my head in the game, I hit Pinterest, which had loads of different ideas...from melting Perler beads (which I can't get here in SA without a huge amount of effort), painted googlie eyes, hot glue, blobs of texture paint etc etc.

This is the result that worked best for me.

Supplies:

  • Glossy Accents from +Ranger Ink 
  • Wax paper
  • Cheap nail varnish

Step #1
Use the squeeze, lift & pull technique to get puffy glue dots.

Step #2
 Once dry.... you have to be patient here. (Too soon & you'll get a mangled dot.) Carefully apply different colours of nail varnish.

Step#3
The result: Piles of  pretty 'almost free of charge' enamel dots.

You've gotta love the fact thatbecause they cost virtually nothing, you don't have to ration yourself to a few per page! 

Go wild...& add dots to everything I say. (Erm... yes....I have that problem right now. Every project coming off my craft table is covered in dots :)

Tuesday, October 15, 2013

Fall leaf tutorial + Shimelle.com

Hey, hey crafty friends! 

This is a heads up about a crafty post & fall leaves tutorial I have up on the shimelle.com website today.

MARBLED FALL LEAVES USING DISTRESS STAINS:: A SCRAPBOOK TUTORIAL BY KIM WATSON <<<that's moi! :)


I used the amazing NEW collection: "Happy-Go-Lucky", from Fancy Pants Designs. Check out the super cute die cuts, resin flowers, veneer sentiment titles & glassine/craft bags. Oh & in case you want to rush out & buy some of those cute embossing/dies, they are all from Fiskars America using the amazing FUSE die cutting machine.

Love, Love, Love!

So please feel free to pop on over to the post for detailed step-out images and info on how to make these beautiful fall leaves.

Happy Tuesday friends!