Showing posts with label Queen & Co. Show all posts

Monday, July 31, 2017

Celebrating with Queen & Co! And a gift, just for you!

Hello Queen & Co friends, Kim here.
I am excited to share my latest project for Queen & Company. Inspired by the FABULOUS Pretty Presents kit, I decided to capture the happy moment of my little friend Callan getting ready to blow the candles out on her birthday cake. These dies, papers & toppers were tailor made for this page.
Hip-hip Hooray layout by Kim Watson
​Using my Silhouette Cameo, I die-cut a pie chart, reason being is I wanted to use a pretty variety of patterned papers from the Pretty Presents 6x6 paper pad. The pie chart allowed me to use eight different pattern papers...the perfect way to create a colorful mat for my photo. 
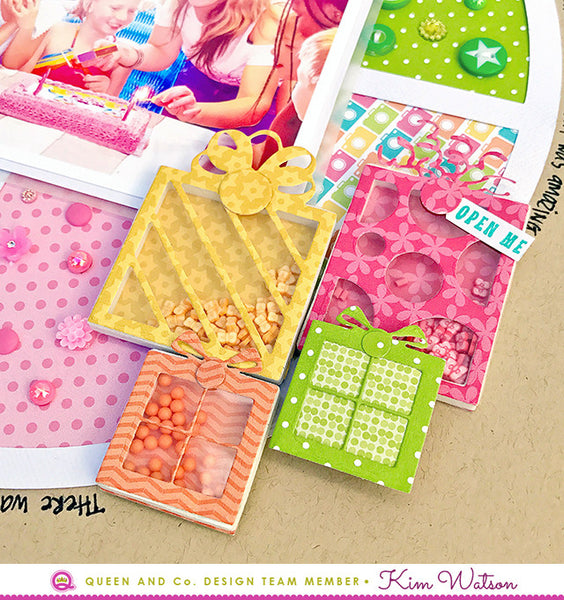
The sweet gift dies made the perfect accents for this page. To make them less busy on an already busy page, I made sure to make them mono tone in color: Pink, yellow, orange & green. To create the 'open me tag' I trimmed down one of the larger stamps. 
The title is made up of a combination of three of the stamps that came in the Pretty Presents kit. By stamping them in different colors onto flag shapes, then attaching them to a striped drinking straw, I not only made a fun unique title but also a festive page accent.
Patterned paper circles folded in half and placed along the top of the page with turquoise bakers twine, not onto adds a ceiling to the page but really gives one the feeling of a celebration!
To make the page extra special I selected a mixture of pretty bling bits to co-ordinate with the patterned papers in each segment. The result is super fun, colorful & festive....Callan can't wait to have her page, in a frame, in her bedroom. 
If you like cut files, I have a gift for you today. 
Enjoy, for your personal use.  Go to our website HERE to download this fabulous FREE cut file!
I​ am so glad you stopped by, I am so happy to be given the opportunity to inspire you.  

Monday, April 24, 2017

Celebrate with glitter & glam with Queen & Co

Hi everyone! Kim Watson here with some of my latest projects to share that focus on the lush Queen & Co glitter washi tapes & regular wash tapes. Let me walk you through my processes.

Friend by Kim Watson


Not having any 12 x 12 paper, I created my own using x4 6x6 sheets from the NEW Delightful dots & Stripes paper pads. The color blocked effect is so visually striking and the perfect canvas for my page.


Using black & white bakers twine, I adhered a circle shape onto the background page to ground the design. It is from this circle that everything else radiates. Clusters of flowers made up of Iridescent flowers, Pom flowers & die cut flowers using the Flowers shaker kit. Leaves made from collaged washi tape then die cut, Buttons, Pinwheels & Lollies. The result is a pretty & highly dimensional floral bouquet.


Two strips of washi tape on the top right corner, helps with visual balance, and again a sweet, floral cluster adds tons of interest. To fancy up the washi circle, I added a few little items from our new Bling collection: Lollies, Iridescent pearls, Pinwheels, Petite Posies & Rivets. This helps the eye travel around the circle to different parts of the page.


19 Card by Kim Watson


Beginning with the Candle Shaker card kit, I filled the different candles with Metallic Pearlies, then sealed the shakers with Metallic washi tape, even the flames got the same treatment. The black card front creates fabulous drama, offsetting the gorgeous & sophisticated color palette of Black, Magenta, Silver & Gold. Iridescent flowers, Pom flowers, Lollies, Petite Posies & Wallflowers add glam & twinkle.


21 Card by Kim Watson


This card is a real event...fitting for a 21st birthday, being a big milestone birthday. I started with the white card base, adding a black panel & magenta Delightful dot patterned paper panel. I then created the 3 tiered cake accent. Remember by collaging strips of washi tape onto a piece of cardstock, you make it more manageable when creating an accent like this one. Once layered & adhered together, I made a cute little bow tie from black & white dotted washi tape. Pinwheels add the necessary bling to the top tier.
Using jewellers wire, I made 4 wobblers to 'jump out' of the cake...an Iridescent flower, punched stars glammed up with Sequins & Pearlies and a gold glitter number 21 really make a 'wow!' statement. Bunched up tissue paper into the top of the cake was the perfect way to hide any workings within the cake :)
I LOVED this months assignments, & I hope you do too? Sigh...so many Queen & Co pretties and only so many hours in a day to craft! Aren't you just loving the new lines? Well if you are & want to purchase some for yourself, the items I used are listed & linked below.
_________________________________________
Thanks for stopping by today & have yourself an awesome week!
~ Kim`

Wednesday, April 19, 2017

Washi Tape ideas you are going to love!

Hi everyone! Kim Watson here with my latest Queen & Co projects to share with you. This month the focus is the lush Queen & Co glitter washi tapes & regular washi tapes. I can't wait to show you what I came up with.

Celebrate Card by Kim Watson
Having my Father's 70th birthday this week, was cause enough for me to create something especially geared towards a guy. Knowing he wouldn't appreciate pastel colors, I selected the blue, gold & silver glitter tapes to decorate my Star Shaker card kit. Laying the tapes diagonally across the card really makes the most of the stripe effect, I especially love how by leaving gaps at regular intervals between the tapes, allowed me to stamp 'CONGRATULATIONS' sentiments, adding to the interest & texture to the card.
Filling the stars was tricky initially because I just couldn't settle on what color would look best to fill the shakers. I decided on the best of both & used both gold and silver, the effect is masculine with a hint of sparkle.
Lastly I die cut a title in black cardstock & stamped a happy Birthday sentiment (from Fiskars USA). The extra contrast is what exactly what I needed to finish off the card.


Just Saying Hello Card by Kim Watson

Beginning with the Windows Shaker card kit, I filled the different quadrants with Metallic Pearlies & Sequins, then using watercolor paper, created a pretty gradient color wash making sure to match the topping colors in each window.


The black cardstock surround with the white windows are the perfect canvas to show off my layered, black, patterned washi tape & sentiment tabs. A stamped flower (from Scrapbook & Cards Today magazine) painted in vibrant colors, is the perfect embellishment for such a striking card!

Now & Forever Card by Kim Watson

This card is a real event...fitting for my brother's up & coming wedding. I started with the white card base, adding a gorgeous floral cut file for some fancy, understated texture. I then collaged strips of glitter washi tape onto a piece of cardstock, making it more manageable to punch out an entire family of gorgeous shimmery butterflies.


Arranged around the card with lilac, Iridescent Pearls & an appropriate sentiment stamp from Paper Smooches, the effect is breathtakingly glamorous!!

Best Wishes Card by Kim Watson


Beginning with the Candles Shaker card kit, I filled the candles quadrants with pastel Metallic Pearlies, then using striped washi tape, covered the candles before adhering the card onto the back.The flames were filled with tiny diamonds & covered with silver metallic washi tape making them all sparkly & fun!


The front was decorated with Iridescent flowers & Pom flowers and other colorful bling bits. A sweet sentiment stamp from Paper Smooches in the form of a little flag creates a great focal point but it is the turquoise bakers twine adhered around the edge of the card that gives the card the finishing touch.

Another month of gorgeous assignments, & I really hope you like them as much as I do. Once again Queen & Co pretties make my job of designing so easy! Be sure to use the linked list below, to grab some of the supplies I used yourself.
Have a fun, craft filled day further!

Tuesday, April 11, 2017

Washi tape Feathers

Sometimes do you find you look at your stash & think...ugh! I really don't have the right embellishment, right?!

I do that all the time.
Until that is I joined the Queen & Co Design Team
I was forced to stop being lazy & think out of the box a little to create embellishments and accents, whilst making the most of their gorgeous products!

This card is the result of one of those light bulb moments!

A Note of Thanks by Kim Watson


  • Gesso a white card
  • Add yellow & gold Shimmerz
  • Splatter with charcoal Shimmerz
  • Machine with zigzag stitching
  • Punch a vellum pinked circle
  • Layer washi tape & a stamped sentiment in a little cluster
  • Collage pink & yellow washi tape on a cardstock base & die cut feathers from MFT Stamps
  • Add buttons & bling bits


I am stoked with the result. A gorgeous card requiring very few supplies...I urge you to try one too.

Thanks for visiting!


Monday, April 10, 2017

Ombre watercolor effect for your cards!


Thanks for joining me on the blog today friends! I have some ideas to share that I hope you are going to love!
Ok, so do you love making cards? Yes, I do!
Do you have friends & family you love give cards to? Yes, I do?
Do you feel like playing with paper right now? Yes, I do?
(Then I think we are on the same page hehe!)
Here are some cards that will add a whole lot of color to someone’s life, using the uber fun, Joy Parade collection from Fancy pants Designs AND gorgeous bling & flowers from Queen & Co. 

Create an ombre effect with complimenting watercolors like I did on these few examples. 

Hello Friend card by Kim Watson


  • Add some bold swashes of watercolor for the background.
  • Punch a vellum scalloped circle.
  • Decorate with flowers & leaves.
  • Adhere little bling accents in ombre colors to match the background.
  • Punch a cute sentiment.
 Celebrate #lifeisajoyparade card by Kim Watson


  • Add some bold swashes of watercolor for the background.
  • Punch a sweet butterfly then paint it in bright colors.
  • Adhere puffy sticker dots in ombre colors to match the background.
  • Attach a cute sentiment from the Ephemera pack

Make a Wish card by Kim Watson


  • Punch an assortment of butterflies from left over scraps.
  • Arrange them in an ombre fashion.
  • Splatter background with ink colors to compliment butterfly colors.
  • Once dry, attach butterflies & sentiment from the Ephemera pack.
Eat Cake by Kim Watson


  • Cut a selection of paper strips, attach adhesive tape on the back.
  • Lay the strips in a pleasing patchwork arrangement, trim off extra.
  • Paint a cupcake Ephemera piece & allow to dry.
  • Attach accent to card with foam tape & a little bunched pile of thread.
  • Decorate with puffy stickers & a sentiment.
Trio of Cards  by Kim Watson


All done…four rainbow inspired cards, sure to bring joy to anyone who receives them. I hope you have enjoyed them. If you are curious how I created the backgrounds, be sure to take a look at my Youtube channel.

Thanks for visiting! 


Saturday, April 08, 2017

Lovely in Lilac with Queen & Co.

Good morning friend...I hope you have a cuppa & are ready for some new inspiration?
For todays card I decided on a purple & lavender color scheme. Isn't it pretty?? The combination of purple papers from the Delightful Dots paper stack & lavender & lilac pretty bits from Queen & Co, make crafting handmade cards so worth it. 
Happy for You by Kim Watson


A watercolor wash on the base card grounds things nicely, on top of which I placed the flower shaker. I selected a variety of purple colored, coordinating items, then filled the shaker & decorated the card. The beauty of Queen & Co products is that as different they are all, they work so well with each other to create the most gorgeous beautiful projects
The result is a fancy, sophisticated card with loads of bling appeal.  
I appreciate you joining me today!
Have a super crafty day!
~Kim

Friday, April 07, 2017

Fill Your Shaker Shape with Flowers!

Hi everyone!
Kim Watson here today with a card created using the uber cute Foam Flower Shaker kitI did something a little different with this set...instead of the traditional topper filled shaker...I filled it with flowers & diamonds. Hello, tell me that isn't the best combination for a special friend in your life??
For this card, I created loose shaker box with clear windows both sides. Before closing the underside I filled the shaker with sparkly diamond toppers giving the card gorgeous sparkle & shineA variety of mixed media techniques on the base card using texture paste, gesso, ink, gold paint & stencils creates the perfect canvas for my trendy flower shaker. 


I took a mixture of NEW Pom flowers, separated the layers and clustered them flat underneath the shaker. The cluster creates a little multi-colored mat and a GORGEOUS focal point. Gold yellow, Petite Posies scattered around, add subtle bling & texture
I'm glad you stopped by & I hope you found this inspiring!
Have a happy crafty day friend!
~Kim


Monday, April 03, 2017

Over the Rainbow Shaker cards by Queen & Co.

Welcome back crafty friends!
Today I have a fun idea, the perfect card to cheer someone up. Again using the fabulous Foam Front cards from Queen & Co, I chose the Rainbow Die & Card Set. I did something a little different with this set too...I created x2 cards with the same dies but with x2 very different results. 
Take a look.
Weather the Storm card by Kim Watson
KimWatson_WeatherTheStorm_Q&Co 01

For this card, I created a rainbow not only using the shaker sections, but also pieces in between, this gave me the correct amount of spaces for a proper x7 piece rainbow. For a little bit of fun & texture I filled the shaker windows with sweet little Pops, matching the colors of the paint underneath. The cloud shaker was filled with sparkly diamond toppers giving the clouds sparkly & shine.
KimWatson_WeatherTheStorm_Q&Co 02

To create the inky clouds scene, I used the cloud shaker paper cover as a mask & an ink pad. Shifting its position and varying the ink pressure, created areas of light & dark. The result...a pretty sky. A cute sun motif & sentiment from the Partly Cloudy Stamp Set from Lawn Fawn, & clear Twinkle Drops were exactly what I needed to complete the card.

For my next card I reversed the rainbow, which is a refreshing take on things.

Weather the Storm card by Kim Watson
KimWatson_SendingColorfulWishes_Q&Co 01

Swapping the card cover piece with watercolor paper, I painted a blended rainbow & allowed it to dry. Using the die in the card set, I cut a new cover, then filled the rainbow shaker pieces with a combination of clear Diamond Toppers & clear Tiny Bubbles. The cloud on the other hand I filled with coordinating rainbow Tiny Bubbles.

KimWatson_SendingColorfulWishes_Q&Co 02

To really support the vibrant rainbow of color on this card, I took a mixture of NEW Pom-pom flowers, separated the layers and clustered them around the page; matching Pops were the perfect flower centers.
Lastly, I selected sequins that also matched the different colors of the paint on the cover. Keeping them self colored added subtle twinkle & texture. I couldn't have asked for a more appropriate sentiment, than the one I selected from Paper Smooches Stamps
Voila! A pretty way to send someone colorful good wishes.
Thanks for stopping by!