Showing posts with label Gifts. Show all posts

Wednesday, April 19, 2017

Washi Tape ideas you are going to love!

Hi everyone! Kim Watson here with my latest Queen & Co projects to share with you. This month the focus is the lush Queen & Co glitter washi tapes & regular washi tapes. I can't wait to show you what I came up with.

Celebrate Card by Kim Watson
Having my Father's 70th birthday this week, was cause enough for me to create something especially geared towards a guy. Knowing he wouldn't appreciate pastel colors, I selected the blue, gold & silver glitter tapes to decorate my Star Shaker card kit. Laying the tapes diagonally across the card really makes the most of the stripe effect, I especially love how by leaving gaps at regular intervals between the tapes, allowed me to stamp 'CONGRATULATIONS' sentiments, adding to the interest & texture to the card.
Filling the stars was tricky initially because I just couldn't settle on what color would look best to fill the shakers. I decided on the best of both & used both gold and silver, the effect is masculine with a hint of sparkle.
Lastly I die cut a title in black cardstock & stamped a happy Birthday sentiment (from Fiskars USA). The extra contrast is what exactly what I needed to finish off the card.


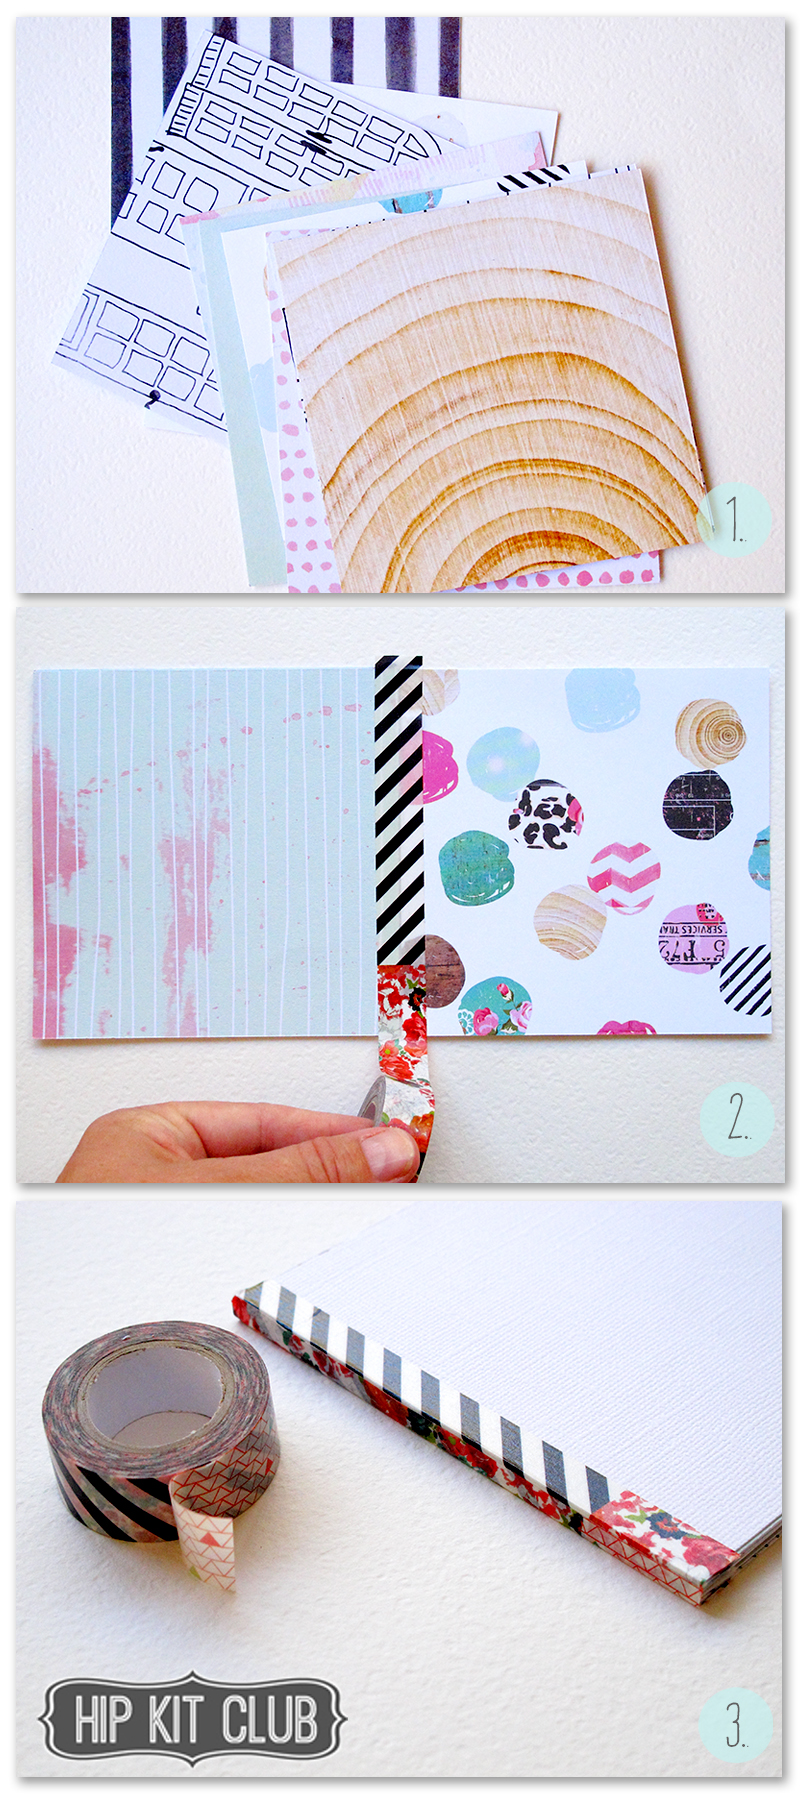
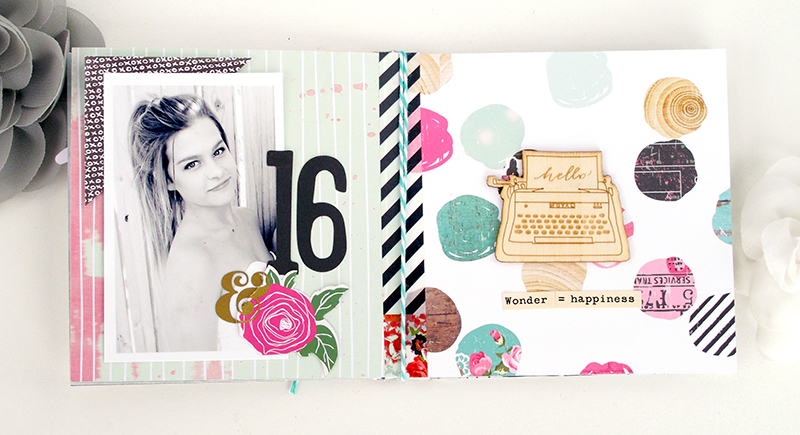
Just Saying Hello Card by Kim Watson

Beginning with the Windows Shaker card kit, I filled the different quadrants with Metallic Pearlies & Sequins, then using watercolor paper, created a pretty gradient color wash making sure to match the topping colors in each window.


The black cardstock surround with the white windows are the perfect canvas to show off my layered, black, patterned washi tape & sentiment tabs. A stamped flower (from Scrapbook & Cards Today magazine) painted in vibrant colors, is the perfect embellishment for such a striking card!

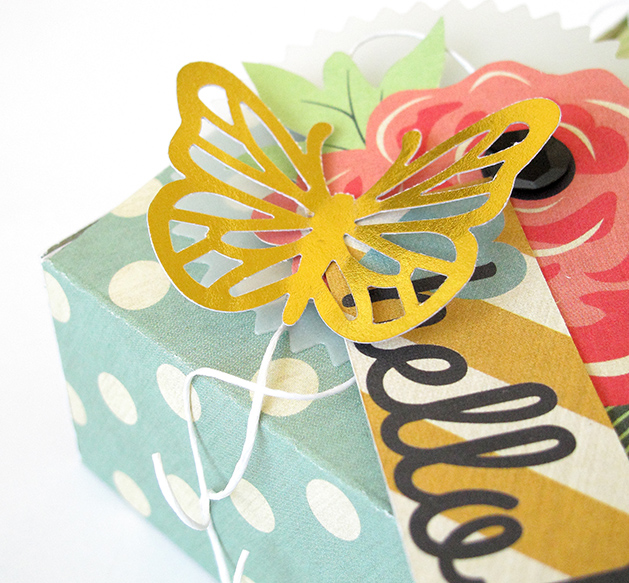
Now & Forever Card by Kim Watson

This card is a real event...fitting for my brother's up & coming wedding. I started with the white card base, adding a gorgeous floral cut file for some fancy, understated texture. I then collaged strips of glitter washi tape onto a piece of cardstock, making it more manageable to punch out an entire family of gorgeous shimmery butterflies.


Arranged around the card with lilac, Iridescent Pearls & an appropriate sentiment stamp from Paper Smooches, the effect is breathtakingly glamorous!!

Best Wishes Card by Kim Watson


Beginning with the Candles Shaker card kit, I filled the candles quadrants with pastel Metallic Pearlies, then using striped washi tape, covered the candles before adhering the card onto the back.The flames were filled with tiny diamonds & covered with silver metallic washi tape making them all sparkly & fun!


The front was decorated with Iridescent flowers & Pom flowers and other colorful bling bits. A sweet sentiment stamp from Paper Smooches in the form of a little flag creates a great focal point but it is the turquoise bakers twine adhered around the edge of the card that gives the card the finishing touch.

Another month of gorgeous assignments, & I really hope you like them as much as I do. Once again Queen & Co pretties make my job of designing so easy! Be sure to use the linked list below, to grab some of the supplies I used yourself.
Have a fun, craft filled day further!

Thursday, April 13, 2017

Make a DIY Easter Bag & Card set in an hour

Hello friends…Kim here with a challenge for you!
Are you like me and have loads of  leftovers of collections just looking for purpose? Well I set myself a challenge for todays post..to find a purpose for the leftovers I have from the super-cute, themed, Millie & June collection. So I thought with Easter around the corner, that I would get a head start with my crafting & come up with a way to transform the supplies into an Easter gift set. The colors are fabulous & the patterns super cute…I knew right away it would not be difficult to do.
This is the result!
Easter Gift Set by Kim Watson
(Youtube process video to follow, see my channel or pop back to see this post once updated)


The first thing I did was look for a whole 12×12 piece of paper. I would need an entire sheet to create the gift bag. Once folded, I die-cut the bunny face to fit the width of the bag, rouged her cheeks, drew her eyes & mouth and then made the bows from the convenient Millie & June die-cut paper bow set.

The card was also super simple to put together. Using a strip of Our Garden patterned paper I cut a backing piece in the gold foil stripe & flipped the leftover piece using the floral side to cut a big pennant shape. I then die-cut a circle from the pennant, making a little window for the chick to peek out of.

The accents consist of a trimmed tag (to hide the sentiment) & a few patterned heart ephemera; which reminded me of Easter eggs. Not having the correct stamp sentiment, I used the speech bubble die-cut & hand wrote Happy Easter, which finished off the card nicely.
So as you can see, repurposing your themed products is not as complicated as you would think. I hope this has inspired you to haul those leftovers out, with the purpose of giving them new life 😀
Thanks for stopping by my blog! Have an awesome week!
Fancy Pants Designs products used: Millie & June


Saturday, March 26, 2016

Easter bags + a tutorial!

Hello crafty friends! I hope your week is going well?
With Easter just around the corner, I thought it might be fun to show you how I made my Easter baskets, for our Easter hunt, planned to happen during our annual Easter brunch. They are sturdy, and a great way to hold Easter eggs & candy from the ‘Easter Bunny.’
Easter Bags by Kim Watson

KimWatson+Easter bags+FancyPants
Supplies: 
KimWatson+Easter tags+FancyPants
Cutting the journal cards down in size into tag shapes, makes them less bulky to attach to the bags once decorated. I used a large alpha for the beginning letter of each child’s name, an appropriate decorative shape, a little sentiment label & a stamped sentiment to complete the tags. The rough twine tie & mini staples, add great texture!
KimWatson+Easter Pinwheels+FancyPants
Next I made each child a pretty pinwheel. They are super easy to put together. Cut a 4×4″ square of patterned paper, slit along the diagonals & fold. Attach to a paper straw with a large brad & add some curly paper strips to make them more festive.  
Easter Bag Tutorial by Kim Watson
KimWatson+Easter Bag tutorial+FancyPants

Instructions:
  • Take a variety of 12×12 pieces of patterned paper
  • Fold either side to the centre 6″ mark
  • Turn 90 degrees & score at 4.5″ & 7.5″
  • Fold along all score lines
  • Adhere top folds
  • Folding each side up, press gusset at 45 degrees, it’ll fold there automatically
  • Cut x2= 2.25″x6″ strips & adhere along front top edge of bag
  • Cut 3/4″x12″ bag handles
  • Adhere in place & stitch either side of the band at the top of the bag to make them extra secure
  • Your bag is ready to be filled
KimWatson+Easter bags top+FancyPants
I hope this tutorial inspires you to get started on your Easter crafting projects? These bags were so rewarding to create & I know each child who receives them will love them as much as I do.
Happy crafting friends!!

Thursday, April 09, 2015

Mini Brag Book + inside pages

I have a mini book to share, as seen on the Hip Kit Club blog a few weeks ago! 
My Mom loves to brag about her kids & grandkids. Visitors pop around for tea & out come the albums & mini books. Knowing this gives me a legit excuse to make mini brag books regularly, particularly because they are quick & so rewarding to make. I make sure, when I design them I don’t add too much journaling, knowing how much my Mom & her sweet friends love to chat,  it leaves conversation space for my Mom to fill in the details.
Mini Brag Book by Kim Watson
@HipKitClub @KimWatson #hipkitclub @crate_paper #minibook
This is how you can make one for yourself.
Instructions:
  1. Using the gorgeous February kit, grab yourself a selection of pretty patterned papers, the American Crafts foam alpha sheet, enamel dots, ephemera die-cuts & gold rub-ons from My Mind’s Eye.
  2. Cut pages for your mini book 4.5″x4.5″.
  3. Using Heidi Swapp washi tape, join the pages together
  4. Once you have the desired amount of pages, attach x2 white cardstock covers to the outer pages for strength.
  5. Bind the whole book together with a couple of layers of washi tape. The beauty of Heidi Swapp washi tape, is that it has a variety of patterns in one roll which makes for super interesting detail on the book spine.
  6. Finally bind bakers twine around the middle pages of the book, tying on the outside.
  7. Let’s fill those pages!!
@HipKitClub @KimWatson #hipkitclub @crate_paper #minibook
Pages 1 & 2:
@HipKitClub @KimWatson #hipkitclub #minibook
Pages 3 & 4:
@HipKitClub @KimWatson #hipkitclub #minibook
Pages 5 & 6:
@HipKitClub @KimWatson #hipkitclub #minibook
Pages 7 & 8:
@HipKitClub @KimWatson #hipkitclub #minibook
Pages 9 & 10:
@HipKitClub @KimWatson #hipkitclub #minibook
Pages 11 & 12:
@HipKitClub @KimWatson #hipkitclub #minibook
Pages 13 & 14:
@HipKitClub @KimWatson #hipkitclub #minibook
Cover: 
KimWatson+MiniBragBook+02HK
Thanks for stopping by today, I hope you have found this mini book inspiring!!
If you haven’t had a chance to purchase your February, March, & April kits yet, then don’t miss out!  They are packed full of a beautiful,  well co-ordinated selection of products, you will LOVE!
Visit the Hip Kit Club website, to secure yours today! 
I am so glad you stopped by today!! 

Thursday, February 12, 2015

How to make pretty paper gift boxes without a template.

Are you planning on giving gifts to loved ones & friends any time soon? If you are like me, & love personalizing your gifts & gift wrapping; then this project is for you.  

The beauty of these gorgeous little boxes is that they are economical on product using only a sheet of 12x12” patterned paper  to make two boxes. They can be made in 15 minutes which is a wonderful time saver!

Join me as I take you through my step-by-step process. 

One piece Gift Box by Kim Watson


Supplies: Patterned paper, Gold Foils paper, Vellum Paper, Tags, Ephemera, Tickets & Die-cuts: +Fancy Pants Designs Burlap & Bouquets collection. 

Instructions:
  1. Cut a piece of patterned paper 10.5” x 6”.  
  2. Score horizontally: 1.75”, 1.5”, 3”, 1,5”, 2,5”.  
  3. Score vertically: 1.5”, 3”, 1.5”. 
  4. Fold along score lines, snipping all the flaps free to the 1.5”mark. 
  5. Fold & adhere the first box flap closed.
  6. Fold it towards the inside of the box. Fold up side flaps & adhere in place.
  7. Fold top box flap, adhering the sides. NOTE: make sure to place the adhesive out of the way to allow for the flaps to slip into & out of the box easily. 
  8. Die cut a pinked edge vellum circle & layer it together with ephemera, a tag sentiment, punched gold butterflies and twirled twine

Fill your completed box with small gifts or candy. I hope this has inspired you to try making some too! I can’t wait to hand mine out after at our Valentine's day breakfast cook up with a bunch of special friends!


Decorate with sweet little butterflies, punched from gold foil & some paper twine for a pretty touch! They are sure to be a hit with all your special friends & family members!


All done! ENJOY your day!


Wednesday, December 09, 2009

Gifts from Bella Boulevard!

Bella Boulevard is one of the sponsors for the CK Dream Team. Last week I received  the most amazing box of goodies from Stephanie filled with their latest lines....& I just couldn't help myself reaching for some of the Christmas one, December Details, to make another of my Teachers Christmas gifts on my to-do-list.

The range is fun & so easy to use & I really love the bright colors & cheerful designs. The line includes five great papers, alpha stickers, die cuts, flowers and stamps.  Everything I needed to make this project & some others I'll post soon :o)


The mug is filled with mini marshmallows, candy canes and a bag of the most delish Cocoa hot drink mix ever!

If you are looking for thesuper hot cocoa drink recipe....try this one out, it's my fave!

The secret ingredient in this mix is the mini chocolate chips, which melt when combined with the boiling water and give the cocoa an extra-rich flavor. The recipe makes enough for four gift-size portions, each of which can be measured into a small plastic bag and tucked into a cup or mug filled with mini marshmallows, candy stick stirrers, and a spoon. Wrap each filled gift cup in cellophane and don't forget to include a tag with the following instructions: "Spoon 3 or 4 generous tablespoons of cocoa mix into your cup (depending on the size), add boiling water, and stir well."

Ingredients
  • 2 cups nonfat dry milk powder
  • 3/4 cup sugar
  • 1/2 cup unsweetened cocoa
  • 1/2 cup mini semisweet chocolate chips
  • 1/2 cup powdered nondairy creamer
  • 1/8 teaspoon salt
Instructions
  1. Measure all of the ingredients into a mixing bowl and whisk them until they are evenly blended.

  2. Store the mix in a tightly covered container at room temperature until you're ready to package it. Makes about 4 cups of mix.


Thanks for stopping by!
KJ