Showing posts with label Heidi Swapp. Show all posts

Wednesday, December 16, 2015

JANUARY 2016 HIP KIT REVEAL!!!

I am so thrilled to share the January 2016 Hip Kits today!  This month’s kits feature products from Hello Love, B-Side, My Story and more!  I love the bright colors splashed with gold accents.  The black & white & grey are great neutrals that give this collection the perfect balance.  There are tons of fabulous embellishment that will make adding texture, dimension & detail to your projects a breeze.  
I hope you like what we have in store for you as much as we do! 
Note:  our January Kits will begin shipping the week of January 8th – as several of the products aren’t expected to be received until January 2nd.
HIP KIT CLUB JANUARY 2016 MAIN KIT
Main

Hip Kit Club Member Price:  $29.95 (requires a 3 month minimum subscription)CLICK HERE to join!Individual Kit Purchase Price:  $34.95
Products Included:
  • 1 sheet – Crate Paper – Hello Love – You & Me Paper
  • 1 sheet – Crate Paper – Hello Love – Smitten Paper
  • 1 sheet – Crate Paper – Hello Love – My Valentine Paper
  • 1 sheet – Crate Paper – Hello Love – Blush Paper
  • 1 sheet – Crate Paper – Maggie Holmes Shine – Sweet Life Paper
  • 1 sheet – Basic Grey – B-Side – Maybe Paper
  • 1 sheet – Basic Grey – B-Side – Prom Date Paper
  • 1 sheet – My Mind’s Eye – My Story – Typewriter Paper
  • 1 sheet – My Mind’s Eye – My Story – Take Aim Paper (gold foil)
  • 1 sheet – My Mind’s Eye – My Story – Grandma’s Quilt (gold foil)
  • 1 pkg. – Crate Paper – Hello Love – Wood Veneer Shapes
  • 1 sheet – Crate Paper – Hello Love – Chipboard Shapes
  • 1 pkg. – We R Memory Keepers – Crush – Gold Thickers
  • 1 pkg. – My Mind’s Eye – My Story – Designer Brads
  • 1 pkg. – My Mind’s Eye – My Story – Rub-Ons


HIP KIT CLUB – JANUARY 2016 EMBELLISHMENT ADD-ON KIT
Embellishment
Price:  $27.95**Hip Kit Club members receive a 15% off on all Add-On Kit purchases
Products Included:
  • 1 set HKC Exclusive Vellum Words (length 3″ – 5″)
  • HKC Exclusive Acrylic Confetti – 20 assorted pieces
  • 1 sheet – My Mind’s Eye – My Story – Everyday Cardstock Stickers
  • 1 pkg. – Crate Paper – Hello Love – Layered Tags
  • 1 pkg. – Crate Paper – Hello Love – Resin Hearts
  • 1 pkg. – Crate Paper – Maggie Holmes – Puffy Stickers
  • 1 roll – American Crafts – Pink & Gold Wide Washi Tape

HIP KIT CLUB – JANUARY 2016 COLOR ADD-ON KIT
Color
Price:  $20.95*
*Hip Kit Club members receive a 15% off on all Add-On Kit purchases
Products Included:
  • 6×6 HKC Exclusive Heart Confetti Stencil designed by Kim Watson
  • 1 jar – Shimmerz – Dazzlerz – Pucker Up Pink Texture Paste
  • 1 tube – Heidi Swapp – Gold Texture Paste

HIP KIT CLUB – JANUARY 2016 PROJECT LIFE ADD-ON KIT
Project Life
Price:  $29.95*
*Hip Kit Club members receive a 15% off on all Add-On Kit purchases
Products Included:
  • 1 set – My Mind’s Eye – My Story – Journaling Cards
  • 1 pkg. – Crate Paper – Hello Love – Stickers
  • 1 pkg. – Heidi Swapp – Aqua Glitter Puffy Alphabet Stickers
  • 1 pkg. – Heidi Swapp – Black & White Number Puffy Stickers
  • 1 book – Heidi Swapp – Gold Clear Accent Stickers
  • 1 pkg. – My Mind’s Eye – Chipboard Buttons
  • 4 assorted – Heidi Swapp – Glitter Bows

HIP KIT CLUB – JANUARY 2016 PAPER ADD-ON KIT
Paper
Price:  $12.95*
*Hip Kit Club members receive a 15% off on all Add-On Kit purchases
Products Included:
  • 1 sheet – Crate Paper – Hello Love – You & Me Paper
  • 1 sheet – Crate Paper – Hello Love – Smitten Paper
  • 1 sheet – Crate Paper – Hello Love – My Valentine Paper
  • 1 sheet – Crate Paper – Hello Love – Blush Paper
  • 1 sheet – Crate Paper – Maggie Holmes Shine – Sweet Life Paper
  • 1 sheet – Basic Grey – B-Side – Maybe Paper
  • 1 sheet – Basic Grey – B-Side – Prom Date Paper
  • 1 sheet – My Mind’s Eye – My Story – Typewriter Paper
  • 1 sheet – My Mind’s Eye – My Story – Take Aim Paper (gold foil)
  • 1 sheet – My Mind’s Eye – My Story – Grandma’s Quilt (gold foil)

HIP KIT CLUB – JANUARY 2016 CARDSTOCK ADD-ON KITCardstock
Price:  $10.95*
*Hip Kit Club members receive a 15% off on all Add-On Kit purchases
Products Included:
  • 2 sheets – American Crafts White Cardstock
  • 2 sheets – American Crafts White Vellum
  • 2 sheets – American Crafts Begonia Cardstock
  • 2 sheets – American Crafts Light Kraft Cardstock
  • 2 sheets – American Crafts Granite Cardstock
  • 2 sheets – American Crafts Fountain Cardstock

Wednesday, July 29, 2015

Let's Celebrate Summer + new layout.

Hello friends! Happy Wednesday!
I have a new page to share with you today using the April Hip Kit & add-on kits. When designing it, I was inspired by vibrant SUMMER colors, & happy memories of our gorgeous teen on the beach.
Celebrate Summer with Friends by Kim Watson
@KimWatson @HipKitClub @websterspages @americancrafts @HeidiSwapp #summercrafts #layout #12x12 #scrapbooking
When sorting through the pretty papers from the April kit, I fell in love with this piece from Webster’s Pagers, but wanted to use both sides. I really didn’t want to cut up x2 pieces of paper for one page, then had a brainwave…why not cut it on the diagonal & flip the one half over allowing me to get the best of both worlds by sticking it together back into a single piece of paper. 
@KimWatson @HipKitClub @websterspages @americancrafts @HeidiSwapp #summercrafts #layout #12x12 #scrapbooking
Making the most of the fabulous printed chipboard accents…the double sheet from American Crafts is filled with great sentiments as well as tags, labels & other die-cuts.
@KimWatson @HipKitClub @websterspages @americancrafts @HeidiSwapp #summercrafts #layout #12x12 #scrapbooking I cut my photos into circles to compliment the happy circle vibe that suits the April Hip Kit & add-ons so well. Layering a B&W photo over a color photo, adds great visual interest to the layout. 
@KimWatson @HipKitClub @websterspages @americancrafts @HeidiSwapp #summercrafts #layout #12x12 #scrapbooking A metal circle die made the mini square card from Webster’s Papers, into a cool circle accent, the perfect addition to my embellishment cluster.
@KimWatson @HipKitClub @websterspages @americancrafts @HeidiSwapp #summercrafts #layout #12x12 #scrapbooking I love how the uber trendy wood veneer sentiment square from Heidi Swapp, gives emphasis to the sentiment card, as well as adds textural dimension to the page.
@KimWatson @HipKitClub @websterspages @americancrafts @HeidiSwapp #summercrafts #layout #12x12 #scrapbooking Come now…tell these alpha stickers & chipboard die-cuts from American Crafts aren’t awesome!!! The variety of fonts, substrates & colors…make for wonderful conversational titles like mine.
I love that there is not much thought needed when putting these pages together because Kimberly from Hip Kit Club solves the hard work by putting the perfect mix of papers, accents & embellishments together. These kits definitely take the angst out of product mixing..this April Hip Kit & add-on kits are a perfect example.
Happy crafting this week friends…I look forward to seeing you next time!

Thursday, April 09, 2015

Mini Brag Book + inside pages

I have a mini book to share, as seen on the Hip Kit Club blog a few weeks ago! 
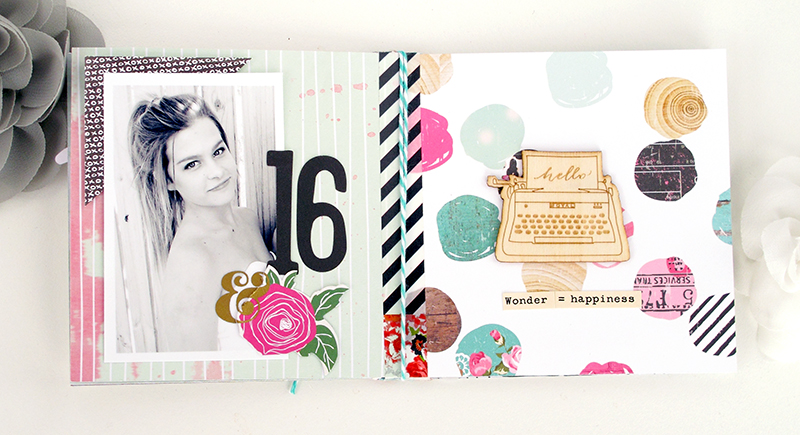
My Mom loves to brag about her kids & grandkids. Visitors pop around for tea & out come the albums & mini books. Knowing this gives me a legit excuse to make mini brag books regularly, particularly because they are quick & so rewarding to make. I make sure, when I design them I don’t add too much journaling, knowing how much my Mom & her sweet friends love to chat,  it leaves conversation space for my Mom to fill in the details.
Mini Brag Book by Kim Watson
@HipKitClub @KimWatson #hipkitclub @crate_paper #minibook
This is how you can make one for yourself.
Instructions:
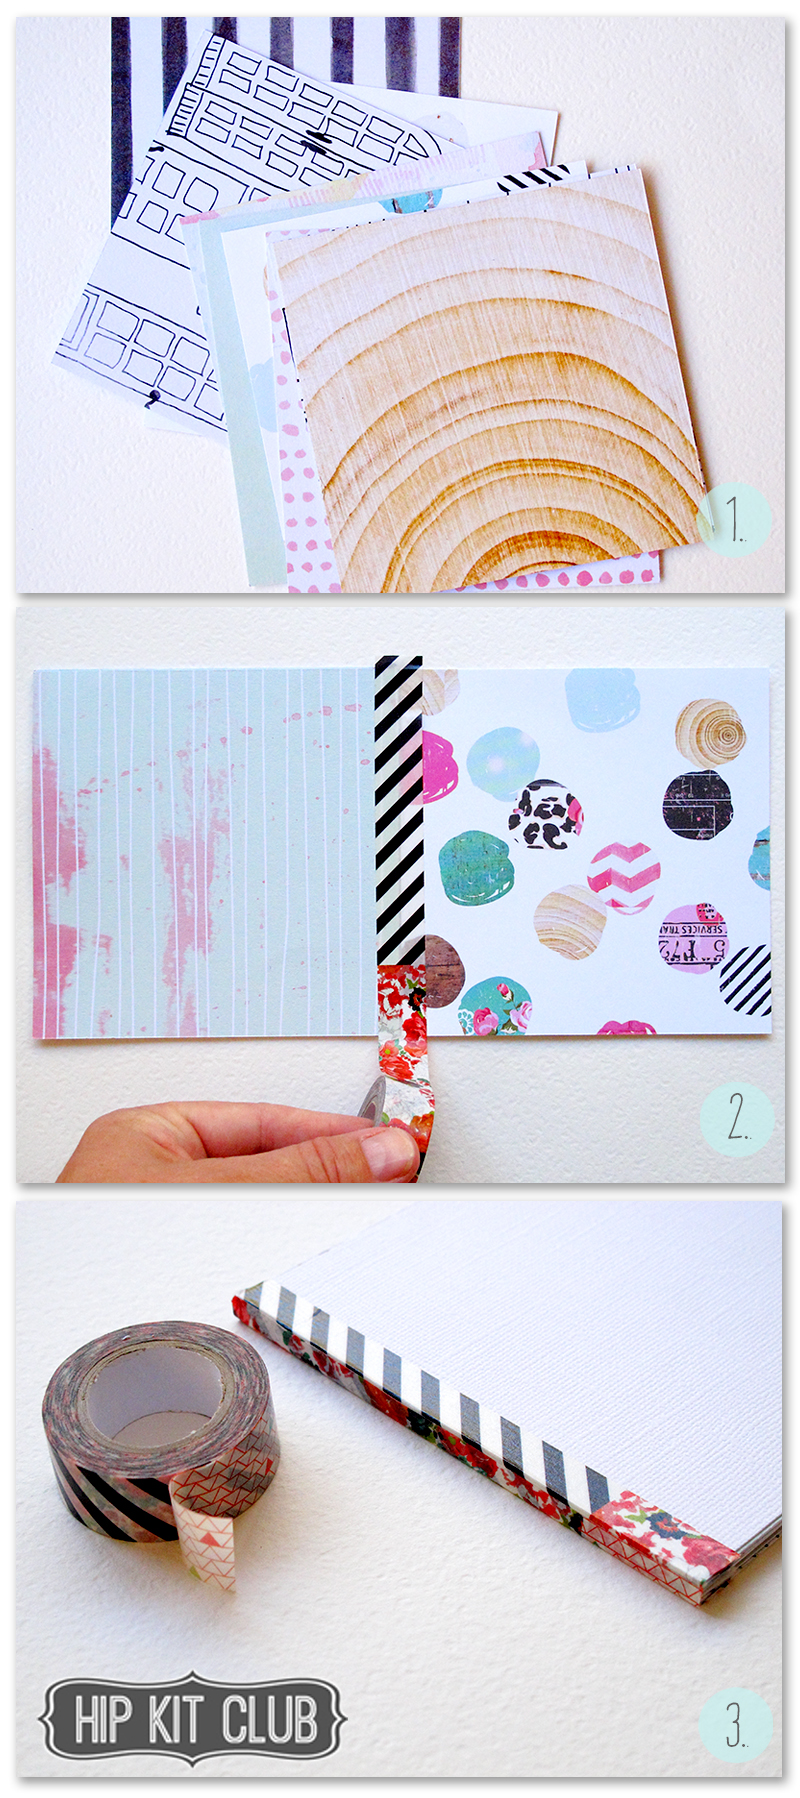
  1. Using the gorgeous February kit, grab yourself a selection of pretty patterned papers, the American Crafts foam alpha sheet, enamel dots, ephemera die-cuts & gold rub-ons from My Mind’s Eye.
  2. Cut pages for your mini book 4.5″x4.5″.
  3. Using Heidi Swapp washi tape, join the pages together
  4. Once you have the desired amount of pages, attach x2 white cardstock covers to the outer pages for strength.
  5. Bind the whole book together with a couple of layers of washi tape. The beauty of Heidi Swapp washi tape, is that it has a variety of patterns in one roll which makes for super interesting detail on the book spine.
  6. Finally bind bakers twine around the middle pages of the book, tying on the outside.
  7. Let’s fill those pages!!
@HipKitClub @KimWatson #hipkitclub @crate_paper #minibook
Pages 1 & 2:
@HipKitClub @KimWatson #hipkitclub #minibook
Pages 3 & 4:
@HipKitClub @KimWatson #hipkitclub #minibook
Pages 5 & 6:
@HipKitClub @KimWatson #hipkitclub #minibook
Pages 7 & 8:
@HipKitClub @KimWatson #hipkitclub #minibook
Pages 9 & 10:
@HipKitClub @KimWatson #hipkitclub #minibook
Pages 11 & 12:
@HipKitClub @KimWatson #hipkitclub #minibook
Pages 13 & 14:
@HipKitClub @KimWatson #hipkitclub #minibook
Cover: 
KimWatson+MiniBragBook+02HK
Thanks for stopping by today, I hope you have found this mini book inspiring!!
If you haven’t had a chance to purchase your February, March, & April kits yet, then don’t miss out!  They are packed full of a beautiful,  well co-ordinated selection of products, you will LOVE!
Visit the Hip Kit Club website, to secure yours today! 
I am so glad you stopped by today!! 

Saturday, March 28, 2015

DIY: Flower techniques for Spring

Happy Spring to all my crafty friends living in the Northern Hemisphere. We are enjoying Fall weather here in Cape Town, which is bitter sweet for us all. It means shorter days & chilly nights with the bonus of less wind...so  I suppose there is an upside to having summer hijacked :D

In honor of Spring, I have a page of our DD to share using a few handmade flower techniques you might find inspiring. This happy color palette, teamed with fresh, candid photos of Cassidy, make for a lovely addition to her teen scrapbook album. 
Your Life by Kim Watson


Supplies: Cardstock: +Bazzill Basics Paper ; Patterned paper: +Heidi Swapp , My Minds Eye; Frame, Brag Card, Stickers: +Fancy Pants Designs  ; Die Cuts Accents, Chipboard: Simple Stories; Ink: Heidi Swapp; Adhesives: +TombowUSA , +Thermoweb, +Scrapbook Adhesives by 3L ; Metal Dies: +primamarketinginc . , +Little B  ; Manual Die-cutting machine: +Spellbinders Paper Arts  ; Other: Sewing machine

For the layout, I clustered handmade flowers around the photo arrangement, creating drama, as well as drawing the eye towards the title, then up to the photos & around to the journaling.

Torn paper & stitching flower: 


Pipe Cleaner & Button flower:


Layered die-cut flower & Leaves:


Stitched leaves & Flowers:


Bought Flower:


Here are a few details about each flower:
  1. Rough rose made with torn paper strips & machine sewing.
  2. Pipe cleaner daisy.
  3. Layered patterned paper flower with felt & button center.
  4. Peony created with metal dies.
  5. Real paper bloom from Prima for a splash of yellow.
NOTE: All leaves are created with metal dies.

To further support my idea of a flower garden, I machine stitched leaves & swirls onto my background page, adding subtle texture & interest. 

I am so glad you stopped bay!
Have a wonderful weekend!

Tuesday, March 03, 2015

Hip Kit Club- Layouts & a Tutorial.

The 2015 February Main kit from the +HipKitClub is rocking my world!!!

Looking for more inspiration from Hip Kits? Here is a link to my Hip Kit Club Pinterest board filled with amazing projects from the DT.


I have had x2 pages up on the blog so far...check them out!

When playing with the patterned papers on my desk, I was immediately drawn to the doors paper. Firstly, isn’t it seriously cool & secondly, isn’t the paper quality super interesting? It lends itself to mixed media & is substantial enough to withstand water, ink, gesso & other ‘wet’ treatments.
It spoke to me, sparking the following thoughts in my brain in reference to my 10 year old:
  • Future
  • Destiny
  • Open Doors
  • Life Choices
  • Colorful Memories
  • Growing up
These ideas came together, as this page :)

Dream Big by Kim Watson
For the title I roughly cut ‘Dream Big’ from the We R Memory Keepers- Love Notes- Dear Diary paper, using a craft knife & doodled the edge in fine black marker for definition.
 To start, I grabbed water-colour paints & licked some funky colors onto the doors, giving them a cheerful vibe. Once dry, I cut them out & arranged them in an overlapping row creating a border for the journal block. The central page layout worked well here, allowing ones eye to travel down the page from the title, to the photograph & lastly resting on the journaling.

For more detailing check out this blog post >>

 This is my other page:

For this post, I shared a super way to transform patterned paper into something gorgeously ‘bling-ified’ (In case you were wondering, yes that is a real word in the vocab’ of every crafter who likes gold glitter)…like me- LOL.

To do this I am going to be using the February 2015 Hip Kit & Add-On Kits, as well as the pretty turquoise tissue wrapping paper our February 2015 Hip Kit came wrapped in.
Girl Powa by Kim Watson

To create that cool glittered strip, I used the wonderfully ingenious invention, called adhesive sheets from +Scrapbook Adhesives by 3L 
This is how I did it:
  • Lay the edge of the paper triangle onto the sticky side of the adhesive sheet.
  • Trim off the excess.
  • Remove the top, protective layer.
  • Sprinkle liberally with fine gold glitter.
  • Press down firmly, making sure the glitter is secured well. You don’t want it falling off :D
  • Tap off any loose glitter…& you are done.
  • NOTE: I left a little glittered strip at the bottom of the triangle, which I trimmed off & cut into mini triangles for accenting elsewhere on the page.

Tissue Bloom Tutorial by Kim Watson
Instructions:
  • Fold the tissue paper into squares in x2 (or more) different sizes. I made x20 layers in total by cutting them in piles of about 6-8 layers.
  • Once you are happy with the amount, pile them on top of each other.
  • Using a stapler, secure the pile together with criss-crossed staples.
  • Place your flower on one hand & gently scrunch with the other. Pinching layers onto a clump.
  • Place the crunched flower on your craft mat & work with the petals. Flatten some, crinkle others & arrange until you have a lovely, puffy bloom.
  • Using a little water, lightly spray the flower before spritzing with turquoise Dylusions Ink, adding vibrant color.
  • Allow it to dry & secure to your page using a strong adhesive.
All done….a striking page that will make your teenage daughter happy.
I appreciate you stopping by!! 

Happy Tuesday!

Monday, February 23, 2015

Fun with washi tape!

I cannot get enough washi tape...& have collected tons over the last few years, so thought is was about time & came up with a few ideas on how to use it in creative ways on a scrapbook page. This page was published in the Papercrafts & Scrapbooking 2014 Scrappers Handbook special issue. 

Washi tape ideas:
  1. Pointed petal folded flower
  2. Little folded origami style hearts
  3. Borders & page edges using overlapping tape in different widths
  4. Chevron detailing on top left corner of left page 
Enjoy This Moment by Kim Watson

 Supplies: Cardstock: +Bazzill Basics Paper ; Patterned paper: Sassafras; Tags: Elle Studio; Wood Veneer: +Freckled Fawn ; Decorative Tape: Bella Boulevard, +AmericanCrafts , +Freckled Fawn , +Glitz Design; Fancy Brads: Simple Stories; Adhesive: +TombowUSA , +Thermoweb; Cutting Files: +Daniela Dobson, Silhouette, +Heidi Swapp ; Electronic die cutting machine: Silhouette Cameo; Other: Typewriter; Sewing Machine.


Stitching in the center of the chevrons, masks any rough torn edges. 


A wood veneer heart makes the cutest flower center. 


Machine stitching the row of hearts give great texture & adheres them to the page.

I know these ideas barely touch the surface of what one can do. If you have any ideas...I am always keen to learn new tricks...so please share them with me.

Thanks for stopping by!!

Tuesday, February 10, 2015

Crafty ways with everyday products!

Yes...it is the week of LOVE!

Yes... it is commercialised......but let's be honest it is fun, and you can be assured, your loved ones on the receiving end of your love gifts & spoils are surely not going to be complaining about commercialism hehe!

The page I am sharing is a scrapbook layout as published in the Feb 2014 issue of Paper Crafts  & Scrapbooking magazine. It is about our cute daughter & one of her (boy) BFF's. Their love & support of each other in an age where life puts so much pressure on one, is refreshing & sweet! Worthy of a scrapbook page.
Love you to the Moon by Kim Watson: Supplies: Cardstock: American Crafts; Patterned paper: +Heidi Swapp, Elle's Studio; Tags & Stamps: Elle's Studio; Buttons: +Fancy Pants Designs; Glitter: Martha Stewart; Mist, Gesso, Ink and Texture Paste: +Ranger Ink; Pen: +Kuretake ZIG ; Adhesive: +Thermoweb, +TombowUSA ; Stencils: The Crafters Workshop; Cutting mat, Scissors, Trimmer by +Fiskars ; Buttons; Other: Black charcoal pencil.

When creating this page....I was challenged to use everyday...ordinary things found at home & in your junk drawer.

These are the obscure things I used: 
  • Bamboo coaster mat
  • Crossword pages 
  • Ticket strips
  • Mat & beads
  • Dental floss

I gesso'd a bunch of tickets from the strip to knock back the red color, & created paper feathers in different sizes. One I left as is, the other I covered in liquid glue & dredged in fine gold glitter. Gorgeous!!


See the little wooden frame around the sentiment card? I used a bamboo coaster mat, undid it and used the thin bamboo sticks as the supports for my feathers & frame. I took my extra minty dental floss & dyed with lime green mist...it became a super color accent for the layout, which I looped & tied across the page.  

BONUS: my page smells all fresh & minty! :)


Using a kiddies art mat & beads, I created a 'love' inspired accent which when ironed melted & sealed together. Using zig-zag scissors, I cut the ironing sheet into a circles, stitched it & matted the bead accent on top. The discarded bead template came in real handy to add 'comb-like' texture to texture paste onto the background before misting & inking. I tore dictionary pages into quarters & gesso'd them onto my background page for texture & interest. 

Left white, I used the dental floss to stitch buttons & hand stitching areas for added interest.

Ok...let me say....as bizarre as this challenge was...I loved it. It stretched me creatively & I loved every moment of designing it.

Thanks for stopping by!