My latest Process Video for Hip Kit Club!

Showing posts with label Tutorial. Show all posts
Showing posts with label Tutorial. Show all posts
Tuesday, July 25, 2017
Saturday, March 26, 2016
Easter bags + a tutorial!
Hello crafty friends! I hope your week is going well?
With Easter just around the corner, I thought it might be fun to show you how I made my Easter baskets, for our Easter hunt, planned to happen during our annual Easter brunch. They are sturdy, and a great way to hold Easter eggs & candy from the ‘Easter Bunny.’
Easter Bags by Kim Watson

Supplies:
- Patterned papers from the Office Suite collection
- 3×4 Journal cards trimmed into tag shapes
- Assorted Ephemera from the Office Suite collection
- A selection of large die-cut alphas
- Resin flowers from previous Fancy Pants Designs collections
- Paper straws which you can find in Fancy Pants Stationery& Party collections
- Brads, Twine, Adhesive & a stapler

Cutting the journal cards down in size into tag shapes, makes them less bulky to attach to the bags once decorated. I used a large alpha for the beginning letter of each child’s name, an appropriate decorative shape, a little sentiment label & a stamped sentiment to complete the tags. The rough twine tie & mini staples, add great texture!

Next I made each child a pretty pinwheel. They are super easy to put together. Cut a 4×4″ square of patterned paper, slit along the diagonals & fold. Attach to a paper straw with a large brad & add some curly paper strips to make them more festive.
Easter Bag Tutorial by Kim Watson

Instructions:
- Take a variety of 12×12 pieces of patterned paper
- Fold either side to the centre 6″ mark
- Turn 90 degrees & score at 4.5″ & 7.5″
- Fold along all score lines
- Adhere top folds
- Folding each side up, press gusset at 45 degrees, it’ll fold there automatically
- Cut x2= 2.25″x6″ strips & adhere along front top edge of bag
- Cut 3/4″x12″ bag handles
- Adhere in place & stitch either side of the band at the top of the bag to make them extra secure
- Your bag is ready to be filled

I hope this tutorial inspires you to get started on your Easter crafting projects? These bags were so rewarding to create & I know each child who receives them will love them as much as I do.
Happy crafting friends!!
Tuesday, March 17, 2015
Mini Book that doesn't require binding ➳ Tutorial
When life is crazy, and your scrapbooking time is limited, do you ever wish you could just finish a project from start to finish?
Then I have just the thing for you to try.
Summer Mini Book by Kim Watson

Let's get started. You will need the following...
Fancy Pants Designs Supplies:
- Brag Cards
- Patterned papers
- Alpha Stickers
- Embellishments
- Buttons
Other Supplies:
- White cardstock
- Serrated scissors
- Adhesive
- Sewing machine
- x3 colored rubber bands
- Regular scrapping tools
Mini Book Tutorial with Rubber Band Binding Technique by Kim Watson

Instructions:
1.) Take a variety of the patterned & plain letter sized paper & fold them in half.
2.) Stick the long open sides together of each page as close to the edge as possible.
3.) Once completed, clamp all pages tightly together in a pile.
4.) Mark off a little notch 3/8" from the 'spine'. The notch can be approx. 1/4" wide & 3/16" high. Cut out with sharp craft knife, making sure to cut through all pages, on the top of spine as well as the bottom. The little recess for the rubber bands to hook on to.
5.) Score every page at 11/16" (which should be at the inner most side of the notch). This will allow the pages to fold back easier.
6.) Stretch your rubber bands around the width of the mini book & place in notches. The pages will be completely secure now.

7.) Prepare your 3x4"cover 'card'. I stitched it, matted it onto white cardstock & added stickers for a great front cover.
Your mini album is ready for filling.

For extra 'space' for journaling & photographs, I filled each page pocket with the extra brag cards Stapling little sticker tabs to the edges of the cards makes it easier to slide the cards in & out of the pockets.
I hope you have found this inspiring! Let me know if you use the technique...I'd LOVE to see your version.
ENJOY your Tuesday!!
Tuesday, March 03, 2015
Hip Kit Club- Layouts & a Tutorial.
The 2015 February Main kit from the +HipKitClub is rocking my world!!!
Looking for more inspiration from Hip Kits? Here is a link to my Hip Kit Club Pinterest board filled with amazing projects from the DT.

I have had x2 pages up on the blog so far...check them out!
When playing with the patterned papers on my desk, I was immediately drawn to the doors paper. Firstly, isn’t it seriously cool & secondly, isn’t the paper quality super interesting? It lends itself to mixed media & is substantial enough to withstand water, ink, gesso & other ‘wet’ treatments.
It spoke to me, sparking the following thoughts in my brain in reference to my 10 year old:
- Future
- Destiny
- Open Doors
- Life Choices
- Colorful Memories
- Growing up
These ideas came together, as this page :)
Dream Big by Kim Watson

Dream Big by Kim Watson
For the title I roughly cut ‘Dream Big’ from the We R Memory Keepers- Love Notes- Dear Diary paper, using a craft knife & doodled the edge in fine black marker for definition.

To start, I grabbed water-colour paints & licked some funky colors onto the doors, giving them a cheerful vibe. Once dry, I cut them out & arranged them in an overlapping row creating a border for the journal block. The central page layout worked well here, allowing ones eye to travel down the page from the title, to the photograph & lastly resting on the journaling.For more detailing check out this blog post >>
For this post, I shared a super way to transform patterned paper into something gorgeously ‘bling-ified’ (In case you were wondering, yes that is a real word in the vocab’ of every crafter who likes gold glitter)…like me- LOL.
To do this I am going to be using the February 2015 Hip Kit & Add-On Kits, as well as the pretty turquoise tissue wrapping paper our February 2015 Hip Kit came wrapped in.
Girl Powa by Kim Watson
To create that cool glittered strip, I used the wonderfully ingenious invention, called adhesive sheets from +Scrapbook Adhesives by 3L
This is how I did it:
- Lay the edge of the paper triangle onto the sticky side of the adhesive sheet.
- Trim off the excess.
- Remove the top, protective layer.
- Sprinkle liberally with fine gold glitter.
- Press down firmly, making sure the glitter is secured well. You don’t want it falling off
- Tap off any loose glitter…& you are done.
- NOTE: I left a little glittered strip at the bottom of the triangle, which I trimmed off & cut into mini triangles for accenting elsewhere on the page.

Tissue Bloom Tutorial by Kim Watson

Instructions:
- Fold the tissue paper into squares in x2 (or more) different sizes. I made x20 layers in total by cutting them in piles of about 6-8 layers.
- Once you are happy with the amount, pile them on top of each other.
- Using a stapler, secure the pile together with criss-crossed staples.
- Place your flower on one hand & gently scrunch with the other. Pinching layers onto a clump.
- Place the crunched flower on your craft mat & work with the petals. Flatten some, crinkle others & arrange until you have a lovely, puffy bloom.
- Using a little water, lightly spray the flower before spritzing with turquoise Dylusions Ink, adding vibrant color.
- Allow it to dry & secure to your page using a strong adhesive.
I appreciate you stopping by!!
Happy Tuesday!
Thursday, February 12, 2015
How to make pretty paper gift boxes without a template.
Are you planning on giving gifts to loved ones & friends any time soon? If you are like me, & love personalizing your gifts & gift wrapping; then this project is for you.
The beauty of these gorgeous little boxes is that they are economical on product using only a sheet of 12x12” patterned paper to make two boxes. They can be made in 15 minutes which is a wonderful time saver!
Join me as I take you through my step-by-step process.
One piece Gift Box by Kim Watson

Supplies: Patterned paper, Gold Foils paper, Vellum Paper, Tags, Ephemera, Tickets & Die-cuts: +Fancy Pants Designs Burlap & Bouquets collection.
Instructions:
- Cut a piece of patterned paper 10.5” x 6”.
- Score horizontally: 1.75”, 1.5”, 3”, 1,5”, 2,5”.
- Score vertically: 1.5”, 3”, 1.5”.
- Fold along score lines, snipping all the flaps free to the 1.5”mark.
- Fold & adhere the first box flap closed.
- Fold it towards the inside of the box. Fold up side flaps & adhere in place.
- Fold top box flap, adhering the sides. NOTE: make sure to place the adhesive out of the way to allow for the flaps to slip into & out of the box easily.
- Die cut a pinked edge vellum circle & layer it together with ephemera, a tag sentiment, punched gold butterflies and twirled twine
Fill your completed box with small gifts or candy. I hope this has inspired you to try making some too! I can’t wait to hand mine out after at our Valentine's day breakfast cook up with a bunch of special friends!

Decorate with sweet little butterflies, punched from gold foil & some paper twine for a pretty touch! They are sure to be a hit with all your special friends & family members!

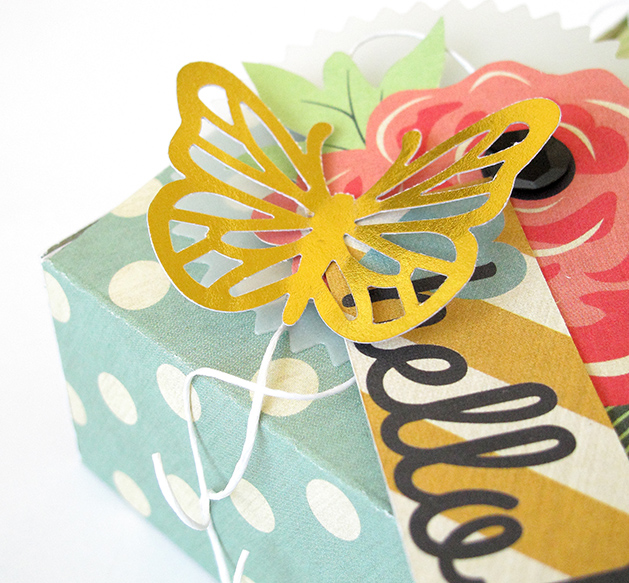
All done! ENJOY your day!
Saturday, January 03, 2015
Handmade tree Ornaments #4- Cornflour Clay Ornaments
As I mentioned the other day...I decided to make all my tree ornaments this year because my color theme & Christmas decor is so totally different from anything else I have done before & wonder of all wonders I actually got myself organised enough to take photos of my creative process.
Here is no. 4: (Scandinavian style)


Here is no. 4: (Scandinavian style)
#4 handmade cornflour clay ornaments!
Supplies:
- Cornflour
- White School glue
- Mixture of letter stamps
- Motif stamps or wood veneer
- Straw to make a threading hole
- Cookie cutters
- Decorative twine for hanging
- Measure out glue & cornflour using the ratio 2:1
- Mix well together in an old dish. It will be super sticky.
- Once mixed, tip out and knead well with extra cornflour to coat your hands.
- Roll out to desired thickness.
- You have to work quickly not to obtain well defined imprints.
- Push doily or doily stamp into clay, making a sharp impression.
- Using cookies cutters, cut into a variety of shapes.
- Use a drinking straw to make a threading hole at the top of the shape.
- Using letter stamps & motifs decorate shapes.
- Allow to air try for 24 hours.
- Take glass sand paper smooth off any rough edges, thread with twine & hang.
So glad you stopped by!
Merry Christmas & a Happy New Year to you all!
Wednesday, December 31, 2014
Handmade tree Ornaments #3- Cork Reindeer.
As I mentioned the other day...I decided to make all my tree ornaments this year because my color theme & Christmas decor is so totally different from anything else I have done before & wonder of all wonders I actually got myself organised enough to take photos of my creative process.
Here is no. 3: (Scandinavian style)


Here is no. 3: (Scandinavian style)
#3 cork reindeer!
Supplies:
- A selection of wine bottle corks
- Twigs
- Gold ribbon
- Toothpicks
- Hot glue
- Sparkly dot for the nose
- Sharp scissors
- Gold twine
- Stapler
- Snip the twigs into x4 pieces to be used as legs
- Snip the twigs into x2 antler shapes
- Cut some of the corks in half to be used as heads
- Using a tooth pick, secure the head to the body
- Push twig legs into the underside of the body cork
- Using hot glue, push the antlers & tail into the correct positions
- Tie gold ribbon around the reindeers neck
- Stick the nose onto the head
- Tie a gold twine loop for hanging & staple to the back of the head
- Slip them onto your twig tree adding a sophisticated pop of black.Remember to visit tomorrow for another tutorial.So glad you stopped by!
Merry Christmas to you all!
Friday, December 19, 2014
Handmade tree Ornaments #2- Straw diamonds.
Welcome back from my next Christmas ornament tutorial.
As I mentioned the other day...I decided to make all my tree ornaments this year because my color theme & Christmas decor is so totally different from anything else I have done before & wonder of all wonders I actually got myself organised enough to take photos of my creative process.
Here is no. 2: (Scandinavian style)
Our tree.....not quite finished yet...but almost there :D

As I mentioned the other day...I decided to make all my tree ornaments this year because my color theme & Christmas decor is so totally different from anything else I have done before & wonder of all wonders I actually got myself organised enough to take photos of my creative process.
Here is no. 2: (Scandinavian style)
#2 straw diamonds!
Our tree.....not quite finished yet...but almost there :D
Supplies:
- Black plastic drinking straws
- Strong twine or yarn of some kind
- Embroidery needle
- Sharp scissors
- Snip the straws into x9 pieces to your preferred length
- Using a single piece of yarn, thread x3 pieces of straw & position into a triangle shape
- Secure at the point where the straws meet
- Add another x2 straws making x2 triangles
- Repeat the process until you can make a mini pyramid shape
- Tie off the yard at the apex leaving long threads loose
- Using another piece of yard, add triangles to the bottom of the shape creating a diamond
- Once completed,, tie off yarn securely
- Knot the loose threads at the apex to create a loop
- Your diamond is ready to hang
Slip them onto your twig tree adding a sophisticated pop of black.
Remember to visit tomorrow for another tutorial.
So glad you stopped by!
Merry Christmas to you all!
Wednesday, December 17, 2014
Handmade tree Ornaments #1- Mini pom-poms.
I love this time of year!
Happy, craft filled days, hand making tree ornaments & gifts. This year I actually took photos of my process for many of the craft projects, wonder of all wonders! Mostly because my color theme & Christmas decor is so totally different from anything else I have done before.
I will be posting tutorials for how I made them over the next week or so, so make sure to stop by my blog for all the details.
#1 mini, yarn pom-poms!
This is our almost completed tree.....follow the journey!
Supplies:
- Plastic picnic fork
- Medium weight knitting yarn
- Embroidery scissors
 |
- Thread a loose piece of yarn through the middle of the fork.
- Wind thread around the middle of the fork until at least an inch thick.
- Using the loose piece of yarn in the middle, tie securely through the middle.
- Slip the whole yarn bundle off the fork.
- Slip the loops either side to release the pile of the pom-pom.
- Tie a loop at the top for hanging.
Slip them onto your twig tree adding a gorgeous splash of color!
Remember to visit tomorrow for another tutorial.
So glad you stopped by!
Merry Christmas to you all!
Thursday, November 13, 2014
Fall Paper Crafting Ideas!
I hope you are having a super week & enjoying some beautiful fall weather where ever you are?
With the richness of fall leaves & trees heavy with color, it goes without saying that it would be the perfect place to go to for crafty inspiration!
This is a fun project I worked on last year for Fancy pants Designs, but never posted it here on my blog. I just love this wall-art...especially all those cute letterpress/ printed leaves using the +Fiskars FUSE, letterpress & die cutting system, and thought you might find it inspiring for your fall decor.
Autumn Wall-Art by +Kim Watson

You will need the following supplies:
- Happy Go Lucky 6x6 Paper Pad
- Happy Go Lucky Ephemera Pack
- Leaf & Flower dies
- Die-cutting machine (I used the FUSE from my friends at Fiskars)
- Ink (if you are letter pressing your shapes)
- A dried Twig
- Brown & cream twine
- Fishing gut
- Glue
- Tape

Whilst I was busy making leaves, I made a whole bunch extra, enabling me to create this fall page too :)
FALL by +Kim Watson


So glad you stopped by! Have a super Thursday!
Thursday, November 06, 2014
Paper Crafter's Library + Featured Designer
ENABLER ALERT! (for a chance to win)
Head on over to Paper Crafter’s Library today to see a fun, project from me and a feature on Fancy Pants Designs! Paper Crafter’s Library is the most comprehensive library of paper crafting videos on the web and a truly wonderful resource for crafters of all levels. If there is anything you need instruction for, they'll be able to show you how.
I have a FULL TUTORIAL on their blog, showing you how to make this cute brag book + a FREE cut-file!


I have more great news! There is a super prize up for grabs too!
Leave a comment on the Fancy Pants Designs blog AND the Paper Crafter's Library blog letting them know what you love about my project and you'll be entered in to win this Oh, Deer! prize pack!

Thursday, October 30, 2014
Fancy pants Designs & Tombow team up!
Let me give you heart failure...........

Erm...I'm nasty aren't I? :)
8 weeks friends....8 weeks.....could someone please resuscitate my crafters heart!
Well in light of that jolt...shall we get cracking with some Christmas crafting ideas?
Today I have a few projects + a tutorial to get you in the holiday mood.
Seasons Greetings by Kim Watson

*Glitter Chevron tutorial
Oh! Deer from +Fancy Pants Designs

Adhesives by +TombowUSA


STEP #2:


STEP #3:

STEP #4:

STEP #5:

 Now for a cute Snow Owl for your Christmas mantel!
To make this littl' cutie, simply cut +Fancy Pants Designs corrugated cardstock into strips & roll ém up. Create a teent top hat from patterned paper, add little feet & die-cuts...& voila! All done!

Supplies- Cardstock: +AmericanCrafts; Patterned papers, Die-cuts, Corrugated cardstock, Stickers, Buttons: +Fancy Pants Designs; Adhesive: +TombowUSA

We like to Chill by Kim Watson 
Supplies- Cardstock: +AmericanCrafts; Patterned papers, Die-cuts, Tags, Vellum paper, Foil Paper, Tickets, Stickers, Mini trees, Sequins, Buttons, Flair: +Fancy Pants Designs; Adhesive & Marker: +TombowUSA; Ink: +Tattered Angels; Metal Circle Dies: +TechniqueTuesday; Cutting Machine: +Silhouette America

Mix vellum & foil, creating the feeling of a chilly, snow flake filled page.

I love that you stopped by!
Happy Thursday!

Subscribe to:
Posts (Atom)