Showing posts with label gift boxes. Show all posts

Saturday, March 26, 2016

Easter bags + a tutorial!

Hello crafty friends! I hope your week is going well?
With Easter just around the corner, I thought it might be fun to show you how I made my Easter baskets, for our Easter hunt, planned to happen during our annual Easter brunch. They are sturdy, and a great way to hold Easter eggs & candy from the ‘Easter Bunny.’
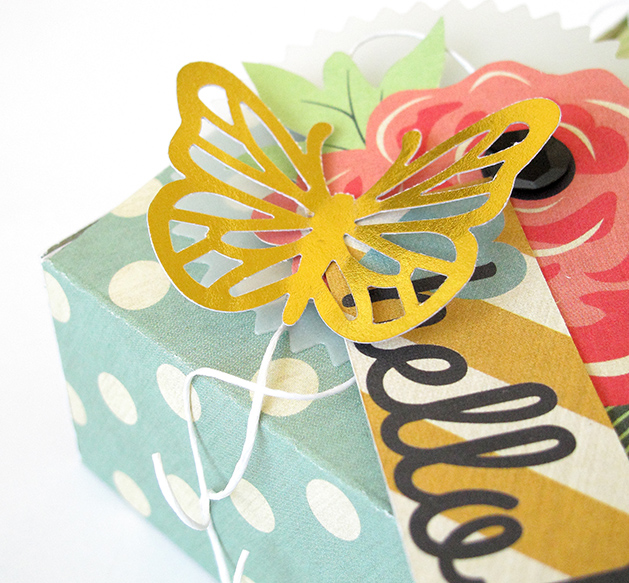
Easter Bags by Kim Watson

KimWatson+Easter bags+FancyPants
Supplies: 
KimWatson+Easter tags+FancyPants
Cutting the journal cards down in size into tag shapes, makes them less bulky to attach to the bags once decorated. I used a large alpha for the beginning letter of each child’s name, an appropriate decorative shape, a little sentiment label & a stamped sentiment to complete the tags. The rough twine tie & mini staples, add great texture!
KimWatson+Easter Pinwheels+FancyPants
Next I made each child a pretty pinwheel. They are super easy to put together. Cut a 4×4″ square of patterned paper, slit along the diagonals & fold. Attach to a paper straw with a large brad & add some curly paper strips to make them more festive.  
Easter Bag Tutorial by Kim Watson
KimWatson+Easter Bag tutorial+FancyPants

Instructions:
  • Take a variety of 12×12 pieces of patterned paper
  • Fold either side to the centre 6″ mark
  • Turn 90 degrees & score at 4.5″ & 7.5″
  • Fold along all score lines
  • Adhere top folds
  • Folding each side up, press gusset at 45 degrees, it’ll fold there automatically
  • Cut x2= 2.25″x6″ strips & adhere along front top edge of bag
  • Cut 3/4″x12″ bag handles
  • Adhere in place & stitch either side of the band at the top of the bag to make them extra secure
  • Your bag is ready to be filled
KimWatson+Easter bags top+FancyPants
I hope this tutorial inspires you to get started on your Easter crafting projects? These bags were so rewarding to create & I know each child who receives them will love them as much as I do.
Happy crafting friends!!

Thursday, February 12, 2015

How to make pretty paper gift boxes without a template.

Are you planning on giving gifts to loved ones & friends any time soon? If you are like me, & love personalizing your gifts & gift wrapping; then this project is for you.  

The beauty of these gorgeous little boxes is that they are economical on product using only a sheet of 12x12” patterned paper  to make two boxes. They can be made in 15 minutes which is a wonderful time saver!

Join me as I take you through my step-by-step process. 

One piece Gift Box by Kim Watson


Supplies: Patterned paper, Gold Foils paper, Vellum Paper, Tags, Ephemera, Tickets & Die-cuts: +Fancy Pants Designs Burlap & Bouquets collection. 

Instructions:
  1. Cut a piece of patterned paper 10.5” x 6”.  
  2. Score horizontally: 1.75”, 1.5”, 3”, 1,5”, 2,5”.  
  3. Score vertically: 1.5”, 3”, 1.5”. 
  4. Fold along score lines, snipping all the flaps free to the 1.5”mark. 
  5. Fold & adhere the first box flap closed.
  6. Fold it towards the inside of the box. Fold up side flaps & adhere in place.
  7. Fold top box flap, adhering the sides. NOTE: make sure to place the adhesive out of the way to allow for the flaps to slip into & out of the box easily. 
  8. Die cut a pinked edge vellum circle & layer it together with ephemera, a tag sentiment, punched gold butterflies and twirled twine

Fill your completed box with small gifts or candy. I hope this has inspired you to try making some too! I can’t wait to hand mine out after at our Valentine's day breakfast cook up with a bunch of special friends!


Decorate with sweet little butterflies, punched from gold foil & some paper twine for a pretty touch! They are sure to be a hit with all your special friends & family members!


All done! ENJOY your day!


Friday, September 16, 2011

'Fancy' clear gift boxes + how-to Tutorial

Morning all.... how are you all doing on this fine Friday morning??? I am having a black & white kinda day. There have been moments of 'grrr!' kinda black moments & 'wheeu-relief!' kinda white moments. I am very glad however that it is Friday & I have no pressing assignments other that some cute developments for Cocoa Daisy kits hehe! no hints sorry! I even have a bunch of 'who-done-it-forensic' novels from the library. Yes things are definitely looking up!

I have a fun tutorial for you today. I was hoping to post it yesterday but I sort of ran out of hours before midnight...do you ever have those days? Better late than never I suppose. I created these sweet gift boxes focusing on the Summers End transparencies for the Fancy Pants blog the other day. Whilst I was making them, I took photographs of the process as I went along, to show you how easy they are to make for yourselves.

Summers End Gift boxes by Kim Watson


For the flat box on the left, I used my Silhouette SD to cut the box shape & used the transparency for the little window on the top of the box. I threaded cotton tape through the holes on the top flap to secure the box closed. It is the perfect size for a CD, jewelry, hair accessories or candy.

Flat gift box by Kim Watson

The clear upright box using transparency to make the box shape was based on an idea I saw over at Split Coast Stampers Resource center, and is so simple to make.

Here are the dimensions:

Transparency: 5.5"x8.5", score along the long side. 2", 4", 6", & 8". You will find there is a 1/2" left over for sticking the box closed. I used Power Bond runner tape by Tombow to do this. (Goodness that stuff sticks like Eddy!

x2 end caps: x2= 3.5" scalloped squares also cut with my Silhouette SD. Score 3/4" around the inside the edge of the square. Cut little slits along the score lines, secure the flaps on the inside to make the little box shaped lids. Cut x2 little slits on the top lid to be able to thread the ribbon through.

Ribbon: +-25"


Clear upright gift box by Kim Watson


Unique hand crafted packaging in a jiffy, an easy way to add personalized flair to any gift. I hope you find the transparencies helpful.

Thanks for stopping by!